LightBlog

vendredi 27 août 2021

Samsung Galaxy Z Flip 3 Review: It’s so good, I bought two

When Samsung launched the original Galaxy Fold back in 2019, I fell in love immediately. It redefined the entire way I thought about smartphones and technology. Instead of just slab phones, the original Fold showed that phones could be so much more, and a year later, the Galaxy Z Fold 2 followed this trend with a host of upgrades.

XDA Best Award
In the meantime, Samsung launched arguably its most important foldable. The original Galaxy Z Flip heralded the launch of the Galaxy Z foldables branding, the revamped hinge that’s the ancestor to the hideaway hinge found on both the Galaxy Z Fold 3 and Galaxy Z Flip 3, and the idea that foldables were for more than just power users; that they could be used by regular users as well.

With the Galaxy Z Flip 3, there are a few welcome improvements. The biggest improvement, however, is not hardware or software — it’s the price. When a phone receives universal praise despite some shortcomings, it’s clear that it’s a winner. This is what you get with the Galaxy Z Flip 3: a $999 product that’s one of the most enjoyable phones ever made and a smartphone that changes the expectations around the perceived value of the phone you’re buying. Here’s why the Galaxy Z Flip 3 is a phone that everyone should consider buying, and a few reasons it might not be perfect for you.

    Samsung Galaxy Z Flip 3
    The Galaxy Z Flip 3 is the first foldable that feels like it was made for the mainstream. At a starting price of $999, it's redefining what is expected from all smartphones, and there are plenty of offers to reduce the price further. This is such a great experience, I ended up buying two for myself, and plan to buy two more for my mother and sister.

      Features:

      Pros:

      Cons:

Welcome to our new review format, where we present the main conclusions on the first page and go deeper in individual sections on subsequent pages. I used the Galaxy Z Flip 3 for over two weeks as Samsung sent over a review sample. It was running on the AT&T network, which has some signal strength issues in my areas of use, possibly impacting battery life.


This is Page 1 of our Galaxy Z Flip 3 review. You can navigate to other parts of this review using the links below:

Samsung Galaxy Z Fold 3 Specifications

Samsung Galaxy Z Fold 3: Specifications

Specification Samsung Galaxy Z Fold 3
Build
  • Corning Gorilla Glass Victus on the outer screen and back panel
  • Armor Aluminum frame
  • IPX8 water resistance
Dimensions & Weight
  • Folded: 67.1 x 158.2 x 16 ~14.4mm
  • Unfolded: 128.1 x 158.2 x 6.4mm
  • 271g
Display
  • Outer display:
    • 6.2-inch HD+ Dynamic AMOLED 2X
    • 2268 x 832; 387 PPI
    • 120Hz adaptive refresh rate
  • Inner display:
    • 7.6-inch QXGA+ Dynamic AMOLED 2X
    • 2208 x 1786; 374 PPI
    • 120Hz adaptive refresh rate
SoC
  • Qualcomm Snapdragon 888
    • 1x Kryo 680 (ARM Cortex X1-based) Prime core @ 2.84GHz
    • 3x Kryo 680 (ARM Cortex A78-based) Performance cores @ 2.4GHz
    • 4x Kryo 680 (ARM Cortex A55-based) Efficiency cores @ 1.8GHz
  •  Adreno 660 GPU
RAM & Storage
  • 12GB RAM
  • 256/512GB UFS 3.1 storage
Battery & Charging
  • 4,400mAh dual-cell battery
  • 25W fast charging support
  • 10W wireless charging support
  • 4.5W reverse wireless charging
  • Charger not included
Security
  • Side-mounted fingerprint sensor
  • AI face recognition
Rear Camera(s)
  • Primary: 12MP, f/1.8, Dual Pixel AF, OIS
  • Ultra-wide: 12MP, f/2.2, 123° FoV
  • Telephoto: 12MP, f/2.4, PDAF, Dual OIS, 2x optical zoom, 10x digital zoom
Front Camera(s)
  • Outer camera: 10MP, f/2.2
  • Inner camera: 4MP, f/1.8, under-display sensor
Port(s) USB Type-C
Audio
  • Stereo speakers
  • Dolby Atmos
Connectivity
  • 4X4 MIMO, 7CA, LAA, LTE Cat.20
  • SA/NSA 5G (Sub6/mmWave)
  • Wi-Fi 6E
  • Bluetooth 5.2
  • NFC
Software One UI based on Android 11
Other Features S Pen Fold Edition/S Pen Pro support
Colors
  • Phantom Black
  • Phantom Green
  • Phantom Silver

Galaxy Z Flip 3 Review Summary: Why I bought two

Samsung Galaxy Z Flip 3, partially folded, in all four colors

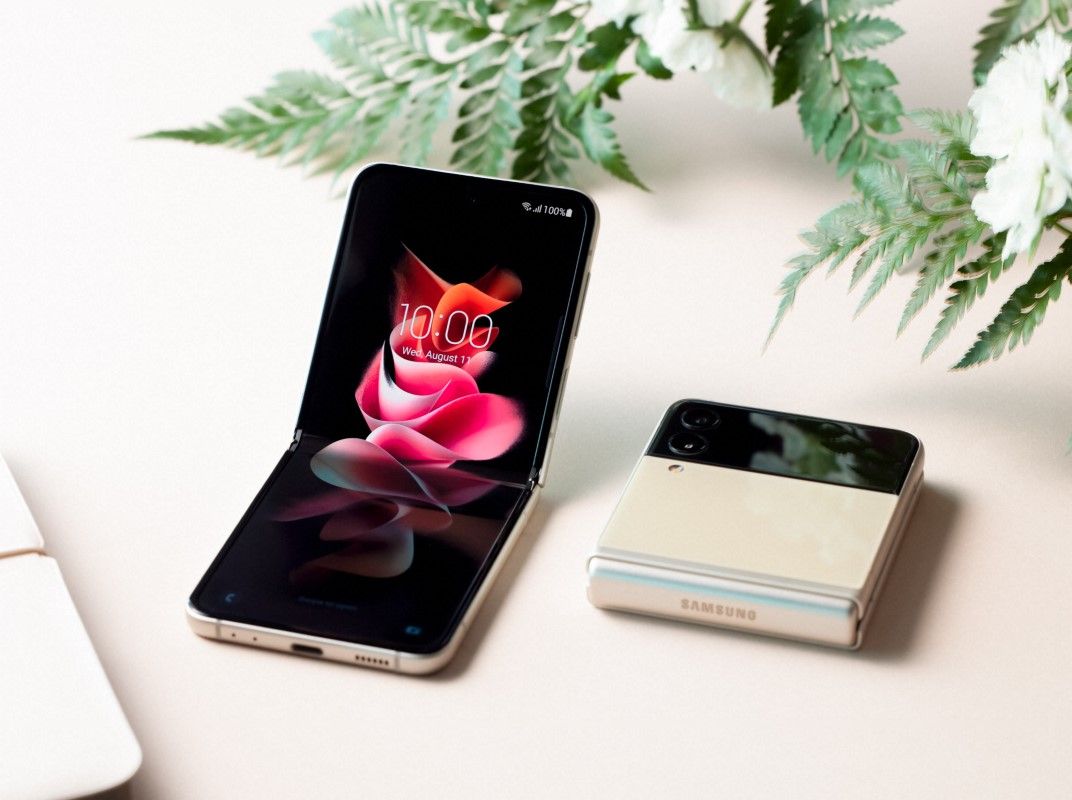
The real magic of the Galaxy Z Flip 3 isn’t the hardware or the software — it’s the price. Samsung has managed to give you all the practical hardware you’d want from a mainstream flagship, including a Snapdragon 888 processor, 120Hz refresh rate in the phone, and two very capable cameras. But they’ve also added a folding display and kept the price at under $1,000. Not to mention, this is now IPX8 waterproof which means it can survive a brief downpour.

The Galaxy Z Flip 3 proves that foldables are ready for the mainstream

The starting price of $999 means the Galaxy Z Flip 3 can bring the cool factor to regular smartphone buyers at a price point that’s not prohibitively scary. A three-figure price tag means it’s affordable on a postpaid plan, or even if you’re buying it outright. However, that’s not all — there’s a lot of offers that reduce the price further. At its full asking price, it’s worth considering, but if you can snag a discount through trade-in or other offers, it’s better than most other devices in the US available at lower price points.

Take for example T-Mobile’s trade-in deals during the pre-order stage. I bought a refurbished Galaxy S9 on Amazon for $180 and traded that in for $1000 off the price tag of the Galaxy Z Flip 3 as part of a new line. Or AT&T’s promos direct through Samsung which basically give you $1000 off the Fold 3 or Flip 3 with eligible trade-in. Plus, Samsung allowed you to trade in up to 4 phones, and while values and the list of eligible devices grew smaller with each additional trade-in, you could still end up saving $1000. Samsung is plowing money into both making the Galaxy Z Flip 3 financially attractive and promoting it heavily across all marketing channels, and this could prove to be the winning strategy that makes foldables mainstream.

It’s certainly not the perfect phone, but the Galaxy Z Flip 3 proves that foldables are ready for the mainstream market. It has enough polish to be a great daily phone for most users, and the shortcomings it does have can mostly be fixed via software. Most importantly, it’s a compelling offering at its full asking price, but the offers this year are so good, it makes this phone an absolute steal.

Z Flip 3

In fact, this phone is so good that I placed my pre-order within 4 days of using it. Nearly two weeks later, I succumbed and pre-ordered a second in cream because the offers were so compelling, and I wanted to alternate between them. I had expected that I’d be tired of the Galaxy Z Flip 3 by now, and while there’s a slim chance that may still happen, I expect this is the one phone that I will use to read e-books, take out on social evenings, and use when I’m generally not in work mode. Not that it’s not capable of serving my work needs, but I prefer to have separate devices for work, and the Galaxy Z Fold 3 is a better purchase if productivity is a must-have for you.

Z Flip 3 Z Flip 3 in purple Z Flip 3

Clearly, I absolutely love this phone, and it’s a great fit for my needs, but should you buy the Galaxy Z Flip 3? That’s the real question, and the answer is yes and no. Here’s a summary of whether it’s right for you.

You should buy the Galaxy Z Flip 3 if…

There are many types of people who would love the Galaxy Z Flip 3. The phone is a perfect fit if you’re fashion-focused, find that phones are too large but still want a big display and if you want something light, friendly in hand, and a bit unique.

You should also buy the Galaxy Z Flip 3 if…

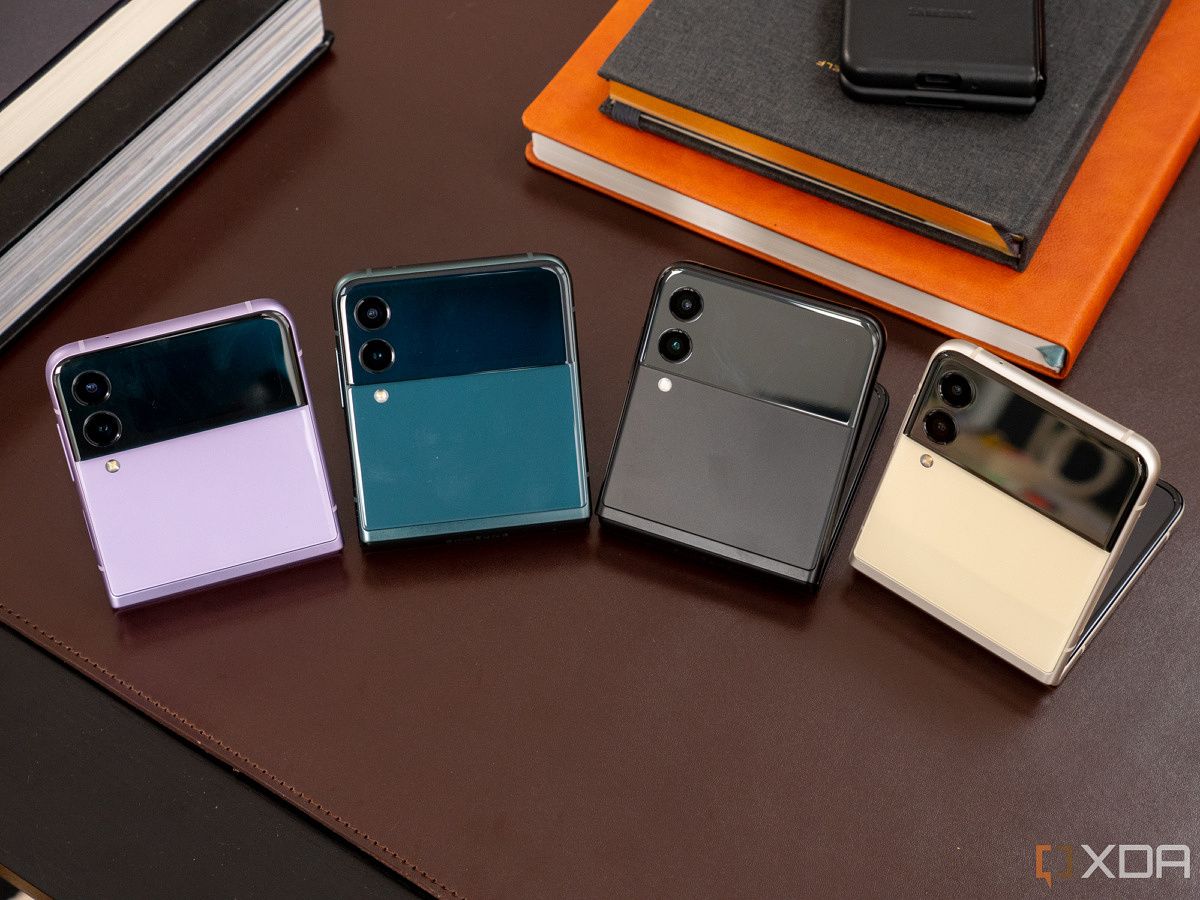
You want to stand out from the crowd

If you’re like me and you want to be the ice breaker or stand out amongst the crowd, get the Galaxy Z Flip 3. It’s guaranteed to get everyone talking, especially for the next year or two until foldables reach true launch velocity equivalent to a conventional glass slab smartphone. There’s a range of colors – I love the Lavender one, and the Pink one also looks great – and it’s effectively the digital version of wearing a pair of outlandish shoes, a bright shirt, or sporting a unique hairstyle; ultimately, these are all meant to help you stand out from the crowd.

You take a lot of selfies

If you love taking selfies, you’ll love the Galaxy Z Flip 3. Seriously, taking selfies is so much fun, and the Galaxy Z Flip 3 almost encourages you to take more. Plus, you have the full suite of camera features available for your selfie photos or videos which results in much better selfies in most lighting conditions.

You are an influencer

If you are a digital influencer, you’ll hate being called a digital influencer, but the Galaxy Z Flip 3 is a great device for you. If you like to take a lot of photos or videos to share on social or record a lot of vlogs, this is the phone you should buy. Samsung’s video prowess is strong here, and you’ll have the full suite of video features, including HDR, 4k@30fps, and portrait video, while also having a phone that catches people’s attention about you and your work.

Samsung Galaxy Z Flip 3, folded, in all four colors

You should not buy the Galaxy Z Flip 3 if…

That said, the Galaxy Z Flip 3 is not the perfect phone for some people. If your primary focus is on productivity, you don’t appreciate the camera, or you don’t see huge benefits from the size changes, you probably won’t get enough benefit out of the Galaxy Z Flip 3.

You should also not buy the Galaxy Z Flip 3 if…

Battery life is crucial for you

If you need all-day guaranteed battery life and can’t plug in to charge, skip the Galaxy Z Flip 3. It’s almost certain that the battery won’t be good enough for you, but if you’re able to carry a portable charger or spend enough time at a desk so you can top up as needed, you should consider it. Fast charging options are also limited, so keep these in mind.

Your camera’s zoom capabilities are important to you

If you take a lot of zoom photos, whether digital (or most likely telephoto), then you should probably also skip the Galaxy Z Flip 3. The digital zoom isn’t the greatest, there’s no dedicated telephoto lens, and you’ll likely end up feeling frustrated. Be sure the zoom is a must-have feature for you, though, as the wide and ultrawide cameras on the Galaxy Z Flip 3 result in great photos.

You want an overkill smartphone

The Galaxy Z Flip 3 focuses on practicality rather than packing in the most overkill set of features for the money. If you need all of the things and sundry in your smartphone, this flipping phone is not for you.


Samsung Galaxy Z Flip 3 Release Date and Pricing

Throughout this review, I’ll mention one very important number: $999. It’s one of the most attractive things about the Galaxy Z Flip 3 experience, and the first time a mainstream foldable has been priced under the $1,000 mark. At full price, it’s a great buy, but when heavily discounted like it has been, it’s an absolute steal.

There are two models of the Galaxy Z Flip 3 available: one with 128GB of storage that starts at $999 unlocked, and another with 256GB of storage that costs $50 more. During the pre-order stage, Samsung was heavily promoting the higher storage version; if you pre-ordered, you received $150 instant Samsung credit and could use part of that to upgrade to the higher storage variant for free.

A lot of tech enthusiasts can recall specific turning points in tech history, and this generation of foldables feels like one. The Galaxy Z Flip 3, in particular, feels like it could have the same impact as the Galaxy S3. That was Samsung’s third phone in the range and the one that really spurred the growth and subsequent dominance of the Galaxy S range. The Galaxy Z Flip 3 delivers on its potential, and it far outpaces anything else so far this year in the running for my phone of the year.

    Samsung Galaxy Z Flip 3
    The Galaxy Z Flip 3 is the first foldable that feels like it was made for the mainstream. At a starting price of $999 it's redefining what is expected from all smartphones, and with several offers, you can save a lot! At $999, it’s a great purchase but at a lower price, it’s a steal that’ll change how you think about phones.

Now you’ve read the summary, read on to check out the detailed review.

The post Samsung Galaxy Z Flip 3 Review: It’s so good, I bought two appeared first on xda-developers.


from xda-developers https://ift.tt/3mfeC08
via IFTTT

HP Elite Folio vs ThinkPad X1 Titanium: Business convertible showdown

There’s no shortage of great laptops out there, and no matter your use case, you can find something you like. But sometimes, choosing the one you like the most might not be easy. Even in the realm of thin-and-light business convertibles, you may find you’re spoiled for choice. Two great contenders in this space are the HP Elite Folio and the Lenovo ThinkPad X1 Titanium Yoga.

Being two lightweight business convertibles, these two laptops have a few similarities. For example, both offer options for cellular connectivity with LTE or 5G, and they come with Windows 10 Pro as an option too. However, these two laptops are vastly different in almost every other way. The prime difference is one is based on an ARM processor, while the other uses Intel processors.

HP Elite Folio vs ThinkPad X1 Titanium: Specs

Let’s start by taking a look at the specs available for these PCs. You can immediately see some big differences this way.

HP Elite Folio Lenovo ThinkPad X1 Titanium Yoga
Operating system
  • Windows 10 Home
  • Windows 10 Pro
  • Windows 10 Home
  • Windows 10 Pro
Processor
  • Qualcomm Snapdragon 8cx Gen 2 (up to 3GHz, 4 performance cores, 4 efficient cores)
  • Intel Core i5-1130G7 (up to 4GHz, 4-core)
  • Intel Core i5-1140G7 vPro (up to 4.2GHz, 4-core)
  • Intel Core i7-1160G7 (up to 4.4GHz, 4-core)
  • Intel Core i7-1180G7 vPro (up to 4.6GHz, 4-core)
Graphics
  • Adreno 690
  • Intel Iris Xe Graphics
RAM
  • 8GB
  • 16GB
  • 8GB
  • 16GB
Storage
  • 128GB
  • 256GB
  • 512GB
  • 256GB
  • 512GB
  • 1TB
Display
  • 13.5-inch WUXGA+ (1920 x 1280) IPS, anti-glare, 450 nits
  • 13.5-inch WUXGA+ (1920 x 1280) IPS, anti-glare, 1000 nits, privacy screen
  • 13.5-inch QHD (2256 x 1504) IPS, anti-glare, anti-smudge, 450 nits
Audio
  • Quad stereo speakers
  • Quad stereo speakers
Webcam
  • 720p HD camera
  • 720p HD camera
Biometric authentication
  • Windows Hello IR camera
  • Windows Hello IR camera
  • Fingerprint reader
Battery
  • 4-cell 46Whr battery
  • 4-cell 44.5Whr battery
Ports
  • 2 USB 3.2 Gen 1 Type-C ports
  • 3.5mm headphone jack
  • 2 Thunderbolt 4 (USB Type-C) ports
  • 3.5mm headphone jack
Connectivity
  • Qualcomm Wi-Fi 6 (2×2) + Bluetooth 5
  • 4G LTE (Snapdragon X20, Cat16) (optional)
  • 5G (Snapdragon X55) (optional)
  • Intel AX201 Wi-Fi 6 (2×2) + Bluetooth 5.1
  • 4G LTE (Fibocom L850-GL, Cat9) (optional)
  • 5G  (Snapdragon X55) (optional)
Colors
  • Black
  • Titanium
Size (WxDxH) 11.75 x 9.03 x 0.63 in (298.45 x 229.36 x 16 mm)
  • 11.71 x 9.16 x 0.45 in (297.5 x 232.7 x 11.5 mm)
Weight Starting at 2.92 lbs (1.32 kg)
  • Starting at 2.54lbs (1.15kg)
Starting price $1,699.20 (varies) $1,771.80 (varies)

Performance: Qualcomm vs Intel isn’t a fair fight

The first thing that will probably get your attention in the spec sheet above is the processors. The HP Elite Folio is powered by the Qualcomm Snapdragon 8cx Gen 2, while the Lenovo ThinkPad X1 Titanium Yoga has Intel processors up to a Core i7-1180G7. ARM processors like the Snapdragon 8cx Gen 2 are great for enabling thin-and-light form factors like this.

Meanwhile, the Intel processors in the ThinkPad X1 Titanium Yoga are from what used to be called the Y series. That means these are also low-power chips meant for fanless, ultra-thin devices. In that sense, these are similar products.

Front view of ThinkPad X1 Titanium Yoga on bench

However, Intel blows Qualcomm out of the water here. We’ve run benchmarks using both of these laptops, specifically an Intel Core i7 version of the ThinkPad X1 Titanium Yoga, and the results are clear. The Snapdragon processor falls short in both single-core and multi-core performance. The difference might be smaller if we took the Intel Core i5 model instead, but looking at benchmarks for that processor, it doesn’t look like it would change much.

HP Elite Folio (Snapdragon 8cx Gen 2) Lenovo ThinkPad X1 Titanium Yoga (Intel Core i7-1160G7)
801/3,150 1,333/4,055

There’s another thing to consider, and that’s native support for these processors. While many apps have already been adapted for ARM processors, many others still need to be emulated, and others still won’t run at all (although this will change in Windows 11 with x64 emulation). Emulation adds overhead, and that means you get worse performance overall. With an Intel processor, every app runs natively and at full performance.

The two laptops are at least equal in terms of RAM, both featuring either 8GB or 16GB of soldered memory with clock speeds of 4,266MHz. However, the Lenovo ThinkPad X1 Titanium Yoga wins in storage too, offering up to a 1TB SSD. The HP Elite Folio maxes out at 512GB. As we’ve mentioned, both laptops also support either 4G or 5G — although you might get faster 4G on the HP Elite Folio.

With an Intel processor, every app runs natively and at full performance.

The only reason to prefer the HP Elite Folio here is potentially the battery life. While the battery sizes are similar, ARM processors tend to be much more efficient, thus you may be able to use the HP Elite Folio for longer without plugging in. HP claims up to 24.5 hours of video playback, while Lenovo says its battery will last 11.7 hours using MobileMark benchmarks. These are different measurement conditions, but you can still expect the HP Elite Folio to be a little better.

Design and ports: The ThinkPad X1 Titanium is lighter, thinner, and better

Moving on to the design, the HP Elite Folio loses a bit more ground. Starting with the positives for HP though, the Elite Folio is an absolutely classy device that really stands out from other laptops. That’s because it uses a vegan leather cover for the exterior, which makes it feel way more nicer to the touch too. In a world of silver-colored metal business laptops, the Elite Folio truly sticks out while still being subtle and appropriate for business users. The Lenovo ThinkPad X1 Titanium Yoga is a bit more boring, using a metal chassis and a titanium color that isn’t too far off from regular silver.

Side view of Elite Folio showing USB port and headphone jack

The HP Elite Folio is also more unique in its form factor. To go from laptop mode to tablet mode, you simply pull the bottom of the screen towards you, and it lays flat over the keyboard. You can even pull it halfway, covering the keyboard but not the trackpad. The Lenovo ThinkPad X1 Titanium turns into a tablet by rotating the hinge 360 degrees, which is how most other laptops do it. It’s a little less convenient, but it’s not a huge deal.

But when you start looking at more objective measurements, Lenovo gains even more ground. At 0.45 inches, the ThinkPad X1 Titanium Yoga is incredibly thin, even more so than the 0.66 inches of the Elite Folio. It also starts at a lower weight — 2.54lbs versus the Elite Folio’s 2.92lbs. This makes it easily the more portable of the two laptops.

(…)the ThinkPad X1 Titanium Yoga is an Intel laptop, so those USB Type-C ports have Thunderbolt 4.

Not only that, but ports are also much better on the Lenovo laptop. To be fair, both laptops have a very small number of ports — essentially two USB Type-C ports and a headphone jack each. The thing is, the ThinkPad X1 Titanium Yoga is an Intel laptop, so those USB Type-C ports have Thunderbolt 4. You can plug in a dock and add all the ports you could ever want, including display outputs. The HP Elite Folio only has standard USB, and it’s USB 3.2 Gen 1 with 5Gbps data rates at that. USB-C hubs also exist, but with this kind of speed, connecting external storage will almost always be much slower.

There are a couple more benefits to the HP Elite Folio, though. Its USB ports are on different sides, so you can charge the laptop from either side. You also have a pen garage above the keyboard, so you can easily store your pen and not lose it. The pen for the Lenovo Thinkpad X1 Titanium Yoga attaches magnetically to the side of the laptop, which means it’s easier to lose it.

On the other hand, Lenovo also includes a fingerprint reader on the power button, giving you an extra option for Windows Hello sign-in. You can’t get that on the HP Elite Folio.

Display: The HP Elite Folio has a privacy screen, but the ThinkPad X1 is sharper

Coming around to the display, both of the laptops use a 13.5 inch panel with a 3:2 aspect ratio, which is great for productivity. In laptop/landscape mode, it’s taller, so you get more space to read text or to fit certain UI elements. In portrait orientation though, it’s wider, so you’re less likely to run into apps that don’t format properly to the display. However, the size and aspect ratio are the only similarities here.

The Lenovo ThinkPad X1 Titanium Yoga has a “QHD” display with a resolution of 2256 x 1504. Lenovo calls it QHD, even though QHD resolution is usually 2560 x 1440. This isn’t as sharp, and the higher vertical pixel count has to do with the 3:2 aspect ratio. Still, this is much sharper than what the HP Elite Folio offers, since that only has a 1920 x 1280 panel.

That’s still sharp enough for most use cases, but if you do want the highest pixel density, Lenovo’s offering is better. Compared to the base model of the HP Elite Folio, the Lenovo ThinkPad X1 Titanium Yoga also has a slightly brighter display at 450 nits, versus HP’s 400. The display on the HP Elite Folio is also extremely reflective, which can make it hard to see outdoors.

HP Elite Folio display angled view

However, HP has a big advantage for business users, and that’s the option for a privacy screen. With HP Sure View Reflect, the Elite Folio can prevent people around you from spying on your work. This technology makes it so that when looking at the laptop from an angle, you can’t see any of the content on the display. That way, you can work on documents at a coffee shop or an airport without worrying about data security as much. You can turn this on or off on the fly, so you don’t always have to have limited viewing angles if you’re in a safe environment. This privacy display also comes in up to 1,000 nits of brightness, which is necessary to ensure you can see the display with the feature enabled.

Both laptops make some sacrifices in the webcam, being limited to 720p resolution and not fantastic quality. However, both do have an IR camera for Windows Hello, making login much easier. Lenovo even gives you the option to add human presence detection so the laptop wakes up when you approach it.

Bottom line: You probably want the Lenovo ThinkPad X1 Titanium

Taking into consideration all the differences we’ve looked at, it’s apparent the Lenovo ThinkPad X1 Titanium Yoga beats the HP Elite Folio in most metrics. It has much better CPU performance, and it runs every app natively too. Plus, it offers more storage, so you can save more files and documents over time. Not only that, it’s lighter and thinner than the HP Elite Folio, so it’s easier to carry around, too. Being an Intel laptop also means it supports Thunderbolt, so you can connect all kinds of peripherals, including displays and even external GPUs. And to round things out, it also has a sharper display, meaning things not only look better, but UI elements can scale down further and make room for extra content.

(…)it’s apparent that the Lenovo ThinkPad X1 Titanium Yoga beats the HP Elite Folio in most metrics.

The HP Elite Folio does have its advantages, though. It has a unique, but classy look that’s different from just about every laptop out there, and that’s great. It also offers the option for a privacy screen, which you’re probably going to want if you work with sensitive information in public environments. The battery might also last you longer since ARM processors are usually more efficient. Plus, the USB Type-C ports are on different sides for easier charging, storing the included pen is easier, and the convertible form factor is a little more convenient.

ThinkPad X1 Titanium Yoga in convertible mode

However, these advantages are mostly up to personal preference. These things aren’t necessarily objectively better, while the benefits of the ThinkPad X1 Titanium Yoga are much more clear-cut. Or they’re things not everyone might care about, like the pen garage only really matters if you actually use the active pen.

Regardless, there are valid reasons to prefer either of these laptops over the other. If you’ve made your choice, you can buy them using the links below. You can currently find the ThinkPad X1 Titanium Yoga on Amazon at a much lower price than the comparable configuration on Lenovo’s website. However, you can’t easily configure its specs on Amazon.

    Lenovo ThinkPad X1 Titanium Yoga
    The Lenovo ThinkPad X1 Titanium Yoga is a very thin and light business convertible, while still offering great performance with its Intel processors. It has a classic business design and a sharp 3:2 display.
    HP Elite Folio
    The HP Elite Folio is one of the best ARM-based Windows laptops around, wrapped in a classy vegan leather that makes it stand out without being flashy. It's also thin and light, and the ARM chipset offers great battery life, too.

The post HP Elite Folio vs ThinkPad X1 Titanium: Business convertible showdown appeared first on xda-developers.


from xda-developers https://ift.tt/3gCbGXQ
via IFTTT

Potential Surface Go 3 shows up on GeekBench and it’s what you’d expect

The Microsoft Surface Go 2 is over a year old at this point, and Microsoft is apparently ready to refresh it. A new benchmark result has recently shown up on GeekBench (spotted by WinFuture), and it gives us some information about the specs that will likely be inside Microsoft’s Surface Go 3.

The benchmark listing shows us two versions of the purported Surface Go 3. One is powered by an Intel Pentium Gold 6500Y along with 4GB of RAM, and the other comes with an Intel Core i3-10100Y and 8GB of RAM. These specs make perfect sense, as previous Surface Go models have also been split into Pentium Gold models and Intel Core models, so there’s nothing too surprising. The amount of RAM also seems to be the same as in the existing models, and it’s enough that both models can run Windows 11.

However, these are much newer components than the ones found in the Surface Go 2. In fact, these processors were introduced just earlier this year. Assuming Microsoft announced the Surface Go 3 this year, it would have much newer processors at launch than the Surface Go 2 did when it launched. That model shipped with an Intel Pentium Gold 4425Y or an Intel Core m3-8100Y.

Surface Go 3 benchmark results

Judging by the GeekBench results, the upgrade will bring significantly better performance for the Surface Go 3, especially the Pentium model. The purported Surface Go 3 with an Intel Pentium Gold 6500Y achieves a single-core score of 3,197, and a multi-core score of 5,643. The highest single-core scores for the equivalent Surface Go 2 hover around 2,200, with multi-core results around 4,300. For the Intel Core i3-10100Y model, we see a single-core result of 4,359 and 7,643 for multi-core. That’s compared to around 4,100 and 6,800 scores for the Intel Core m3-8100Y. Again, better performance is to be expected with any generational upgrade.

The Intel Pentium Gold 6500Y has a base clock of 1.1GHz with boost speeds up to 3.4GHz. It also comes with 4MB of cache, double of what’s in the Pentium Gold 4425Y. Meanwhile, the Intel Core i3-10100Y comes with a 1.3GHz base, and it can boost up to 3.9GHz. It also has 4MB of cache, but that’s the same as its predecessor in this case. The new processors have two cores and four threads, just like the previous models, and they’re still low-power Y-series models.

Because this is just a CPU benchmark, there’s nothing else we can glean from this listing. However, seeing this come online suggests that an announcement may be coming soon. We’ve also heard reports about a potential Surface Book 4, and Microsoft is likely to refresh its hardware to go along with the Windows 11 launch later this year.

The post Potential Surface Go 3 shows up on GeekBench and it’s what you’d expect appeared first on xda-developers.


from xda-developers https://ift.tt/3Bio6fA
via IFTTT

How to install Windows 11 on Mac with Parallels (Intel)

There’s no doubt that macOS is great. It has a clean modern look and runs incredibly fast on Apple’s optimized hardware. That being said, sometimes you need to use Windows, even on your Mac. Parallels Desktop 17 is the newest iteration of the popular software that runs Windows side by side with macOS. There are numerous programs you may use which still only run on Windows. You also might need to run some Windows applications for work. For those that enjoy gaming on their laptop, the ability to run some PC games on your Mac is an added bonus.

One of the most appealing features of Parallels Desktop 17 for Mac is the ability to run Windows 11 on your Apple hardware. Currently, Windows 11 is currently available in beta via the Windows Insider Program. In this tutorial we’ll show you how to install Windows 11 on Parallels Desktop 17 for Mac. If you use Chrome OS, check out my tutorial on installing Windows on Chrome OS.

parallels 17 splash

Before we begin, there are a few key things to note. The installation is a two-step procedure. First, you need to install Windows 10 on Parallels Desktop 17. After you have a working Windows 10 virtual machine in Parallels, you can join the Windows Insider Program to obtain Windows 11 Pro.

Secondly, this process is a bit different for Intel Macs versus M1 Macs. This tutorial will focus on Intel Macs. We’ll have a follow-up tutorial on using Parallels Desktop 17 with M1 Macs. I’m using my 2018 Macbook Pro with the Intel Core i9 processor for this tutorial.

Install Parallels Desktop 17

The first step towards installing Windows 11 on your Mac is to download Parallels 17 Desktop. You can accomplish this by heading to the Parallels 17 trial page and clicking the Download Parallels Desktop button.

parallels 17 trial

The Parallels Desktop 17 installer DMG file will appear in your Downloads folder, which you can double-click to begin installation.

parallels 17 finder

You’ll likely get a warning that Parallels Desktop is an app you downloaded from the internet. This is a standard Apple dialog box for security purposes. Simply click Open to continue.

parallels 17 permissions

Double-click on the box icon with a Windows display inside it (see below). At this point, the installer will download the entire Parallels Desktop 17 software package to prepare for installation. This file is around 325MB on Intel Macs, as you can see in the screenshot below.

parallels 17 install dialog

Next you’ll need to accept the Parallels 17 software license agreement. You can also choose to share information with Parallels to help improve the stability of the software. If you don’t want to share this information, simply uncheck the box.

parallels 17 agreement

Now that Parallels is installed on your machine, you’ll need to download Windows 10. The good news is Parallels handles the entire Windows 10 download process for you.

Download and install Windows 10

The Parallels 17 Installation assistant will present you with a dialog box for downloading Windows 10. Keep in mind you can also run other operating systems using Parallels, like Linux or older versions of macOS. This means you can technically skip this step when installing Parallels 17. However, since our end goal is to use Windows 11, we’ll install Windows 10 here.

parallels 17 download windows 10

After choosing the Install Windows option, Parallels will begin downloading Windows 10. The download is quite large as you might expect — 5.82GB for my 2018 Macbook Pro. Depending on your internet speed, this step can take a fairly long time.

parallels 17 downloads windows 10

After Windows 10 is completely downloaded, you’ll need to accept a few permissions to finish the installation and set up Windows 10 with Parallels 17. The microphone permission below may seem a bit strange, but it’s just a requirement to run the Windows 10 startup process.

parallels 17 more permissions for windows

After accepting permissions, Windows 10 will complete the startup process, which can also take around 10 minutes total, depending on which Mac you’re using.

parallels 17 windows 10 install

Finally you’ll see a completion screen with a large green check mark. Windows 10 is now installed and running as a virtual machine in Parallels Desktop 17 for Mac.

parallels 17 install complete

To actually use Windows 10 in the virtual machine you need to read and accept a few more agreements relating to data privacy. These are fairly standard legalese, but you should read them to know what you’re getting into by using this software.

parallels 17 privacy warning

After accepting these privacy agreements, Windows 10 will open Microsoft Edge and display the Parallels 17 splash screen, indicating you have successfully installed Windows. There’s actually some useful information on this page so let’s take a look at a few of the helpful hints. parallels 17 welcome

The first suggestion is to install all the necessary Windows applications you’d want to use. You can certainly do this now, but since we’re planning to install Windows 11 in this tutorial, I would recommend holding off until after you’re using Windows 11 in Parallels.

parallels 17 welcome 2

The next suggestion is to choose how Windows appears and interacts with macOS and other Mac applications. The options are Coherence mode or Full Screen mode. I would recommend giving some consideration to how you plan to use Windows on your Mac before making a choice.

If you want to run the occasional Windows app or two, Coherence mode is great because you can forget you have Windows installed at all. On the other hand, if you’re going to use Windows the majority of the time, Full Screen mode is probably best. You can go ahead and choose the appropriate mode at this step, and the choice will carry over when we install Windows 11 later.

parallels 17 welcome 4

The final dialog box simply mentions that all of your Mac files are accessible within the Windows user profile folders. This is one of the best features of Parallels, as it allows you to use macOS and Windows side by side in a seamless fashion. You can even choose to set files in macOS to open in a Windows app by default, which is really cool.

Install Parallels Toolbox for Mac and Windows (optional)

At this point you can continue directly to the Windows 11 installation below, but I would recommend taking a few minutes to install Parallels Toolbox for Mac and Windows. This program is actually a standalone product itself, but comes bundled with Parallels Desktop 17. These toolboxes allow you to complete several common tasks on both macOS and Windows.

parallels 17 toolbox

A window will pop up and offer to install both the Mac and Windows toolbox. It’s very quick to install these programs and they’re quite useful if you plan to jump between macOS and Windows fairly often. The Mac version of the toolbox has quite a few more options, such as presentation mode, image resizing, and the ability to uninstall programs from your Mac.

parallels 17 tools reinstall

The Windows toolbox is a bit more limited, offering the ability to download videos, take a break from work, and some other various screenshot tools in the Dashboard. Either way, considering these tools are free and fairly robust, you may as well grab both packages.

parallels 17 windows toolbox

Join Windows Insider Program

The next step in our journey is to join the Windows Insider Program. To do this, first navigate to the Windows 10 menu at the top of your Mac while using Parallels Desktop. Choose the option About Windows 10.

parallels 17 windows 10 about

Inside this menu you will see a menu pane on the left hand side. Near the bottom you will click on the Windows Insider Program option.

parallels 17 insider 1

A warning should pop up alerting you that you need to turn on optional diagnostics data. This is a requirement to join the Insider Program and provide feedback on the beta software experience. Follow the instructions to turn on the optional diagnostic inside Diagnostics and Feedback settings. paralles 17 insider 2

After enabling the optional diagnostics data, return to the Windows Insider Program menu to join. Click on Get Started to begin the process.

parallels 17 insider 3

Next, you need to register your account for the Windows Insider Program, or switch to an account that’s already registered. For this, you will need to log into your Microsoft account if you haven’t already done so within Windows.

parallels 17 join insiders

The next pop up that appears will allow you to join the program by clicking Sign Up.

parallels 17 join insider2

Accept the Windows Insider Program Agreement and Privacy Statement by checking the appropriate box. Click Submit.

parallels 17 insider agree

After accepting these agreements you’ll need to restart Windows from within Parallels Desktop 17 to get the preview build of Windows 11.

parallels 17 insider restart

Download and install Windows 11 beta

After Windows restarts, head back to Settings and check for available updates. You should see an available build of Windows 11 Insider Preview, which should be the newest version. There may be a few other updates as well. Wait until the Windows 11 Insider Preview downloads completely before restarting. When the download is complete, restart to install Windows 11 Pro.

parallels 17 windows 11 update

Return to the settings menu after the restart and check you are now running Windows 11 Pro.

parallels 17 windows 11 pro

You can now use all of the new features of Windows 11 Pro available in the Insider build. All of your files from macOS appear seamlessly in Windows 11 and you can even set certain files to open with Windows programs by default.

parallels 17 windows 11 start

Personalize Windows settings for Parallels

Now you’ve installed Windows 11 on your Mac, you should configure some of the settings for Windows within Parallels Desktop 17. To do this, head to the Actions menu at the top of your Mac. You may notice that Parallels still identifies this as Windows 10, since this is an Insider build of Windows 11. Choose the Configure option from the bottom of this menu.

parallels 17 windows 11 ui

When the configuration menu opens, you’ll notice the operating system is now correctly identifying as Windows 11. Below that you can configure your Windows installation for different use cases. This changes the total amount of storage reserved for Windows 11 on your Mac.

parallels 17 windows config

You can also change how Windows starts up and shuts down, optimization for battery saving, and sharing options within this menu. It’s worth spending some time to tune these settings in each tab, especially if you plan to switch back and forth between Windows and macOS.

parallels 17 windows config 2

Lastly, keep in mind it’s a good idea to suspend Windows if you don’t plan to use it for a substantial period of time. While Parallels Desktop 17 is better optimized than ever, it can still take up a substantial amount of system resources while running. This is primarily important if you only plan to use Windows for a few programs and spend the majority of time in macOS.

parallels 17 windows 11 suspend

At this point, you should be good to go with Windows 11 Pro on your Mac. Parallels Desktop 17 is an excellent product, especially for students. The overall experience running Parallels Desktop 17 has been quite positive for me thus far. I personally prefer coherence mode, where I can use Mac and Windows apps side by side. The fact you can now enjoy Windows 11 on Mac with both Intel and M1 Macs is also a big deal, so it’s great Parallels shipped this update so quickly.

    Parallels Desktop 17 for Mac
    The new Parallels Desktop 17 for Mac offers support for Windows 11, macOS Monterey, and Apple silicon hardware. All of these new features come with added performance improvements, making this the best Parallels Desktop yet.

The post How to install Windows 11 on Mac with Parallels (Intel) appeared first on xda-developers.


from xda-developers https://ift.tt/3kBbKbM
via IFTTT