LightBlog

dimanche 28 juin 2020

Samsung Galaxy Buds+ Review: The Meaningful Increment

Wireless earphones and truly wireless earphones have both been around for a few years now, but it’s only recently that we have seen their popularity explode. That’s thanks in part to OEMs insisting on the removal of the 3.5mm headphone jack from their top phones and then pushing out wireless audio solutions as additional purchases. Samsung has been in the wireless audio game for a fair few years, with releases like the Gear Icon X in 2016 that catered to fitness enthusiasts. But with the Galaxy Buds in 2019, Samsung shifted its focus on attracting the mainstream audience with a more discreet yet stylish design, and they actually ended up doing an excellent job. The Samsung Galaxy Buds+ succeed the Buds by claiming to assimilate the feedback received into a more well-rounded product. But how good are the Galaxy Buds+ in 2020? Here’s my review of Samsung’s flagship true wireless earbuds.

Samsung Galaxy Buds+: Specifications

Specifications Samsung Galaxy Buds+
Dimensions and Weight
  • Earbud:
    • 17.5 x 22.5 x 19.2mm
    • 6.3g
  • Case:
    • 38.8 x 70 x 26.5mm
    • 39.6g
Battery and Charging
  • Earbud: 85mAh
  • Case: 270mAh
    • Qi Wireless Charging
Speaker and Mic
  • Woofer plus Tweeter
  • 2x Mics (outer) plus 1x Mic (inner)
Connectivity
  • Bluetooth 5.0
  • Profile: A2DP, AVRCP, HFP
  • Codec: Scalable (Samsung proprietary), ACC, SBC
Sensor and other hardware Accelerometer, IR, Hall, Touch, 3x Microphones
Box Contents
  • Earbuds
  • Wingtips (S, M, L)
  • Eartips (S, M, L)
  • Charging Case
  • Charging Cable (USB Type-C)
  • Quick Start Guide
Colors White, Blue, Black, Red, Pink, Special BTS Edition Purple

Note: Samsung India sent us a Samsung Galaxy Buds+ for review. However, they did not have any inputs on the contents of this review. This review is after about three weeks of usage.


Samsung Galaxy Buds+ — Design and Build

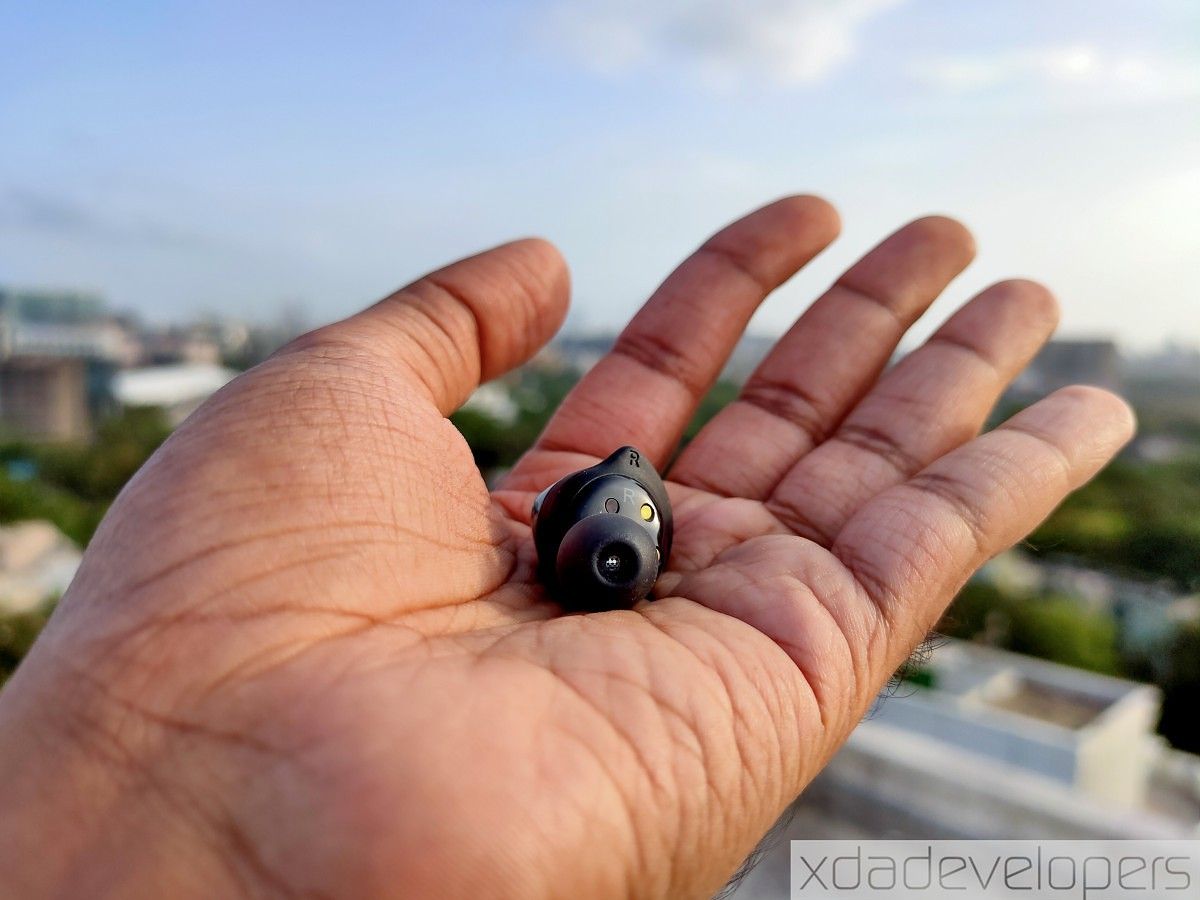
The Samsung Galaxy Buds+ are similar in design to the original Galaxy Buds. But as is the general theme with this product, the changes are subtle but lend themselves to an experience that is much more complete than the predecessor. The only way you can differentiate the Galaxy Buds from the Galaxy Buds+ is by looking for the third microphone hole on the latter. Otherwise, they look the same externally.

Samsung Galaxy Buds+

The Galaxy Buds+ has a build that does admittedly feel a bit cheap and unbecoming of the price tag. The glossy surface areas on the earbud touchpads and the case can retain fingerprints and make them look dirty. The gloss also contrasts strikingly from the rubber wingtips, and it gives the buds a design that does not feel as seamless as some of the competitors, especially against those with protruding stems like the Apple AirPods.

Samsung Galaxy Buds+

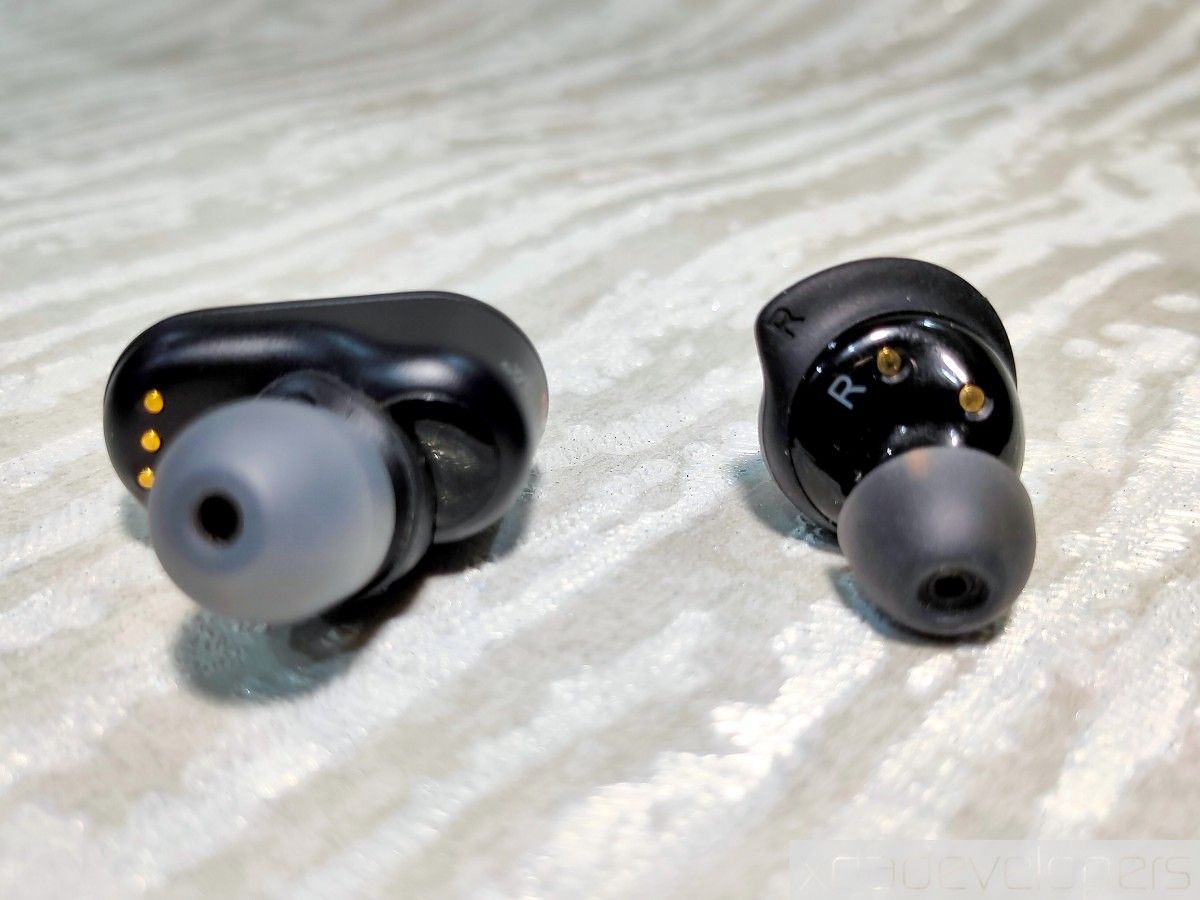
Samsung Galaxy Buds+: Difference between S and L wingtips. Notice the lack of stabilizing protrusion on the S size wingtip (on the right)

Curiously, Samsung shows the “S” sized wingtips in most of its marketing and promotional material, and this wingtip has no protruding stabilizers while the other two sizes have protrusions/small “stabilizers” that try to hook onto the pinna. Even on the largest wingtips, the stabilizers aren’t too large, so they are unlikely to cause irritation, annoyance, or discomfort.

Samsung Galaxy Buds+

Samsung Galaxy Buds+ Samsung Galaxy Buds+

Samsung’s attention to detail comes to light when you observe the wingtips closely—the plastic shell on the Galaxy Buds+ has a raised pimple on the underside and the rubber wingtip has a complementing puncture, ensuring that there is only one correct way to have the earbud wear the wingtip.

Once you get over the overuse of gloss on the Galaxy Buds+, you realize that the rest of the package is actually amazing. The Galaxy Buds+ earbuds have a small footprint, and they protrude from your ears by only a small margin. They are also fairly lightweight. The net result of this combination is that I have experienced no fatigue from wearing them for a few hours at a stretch.

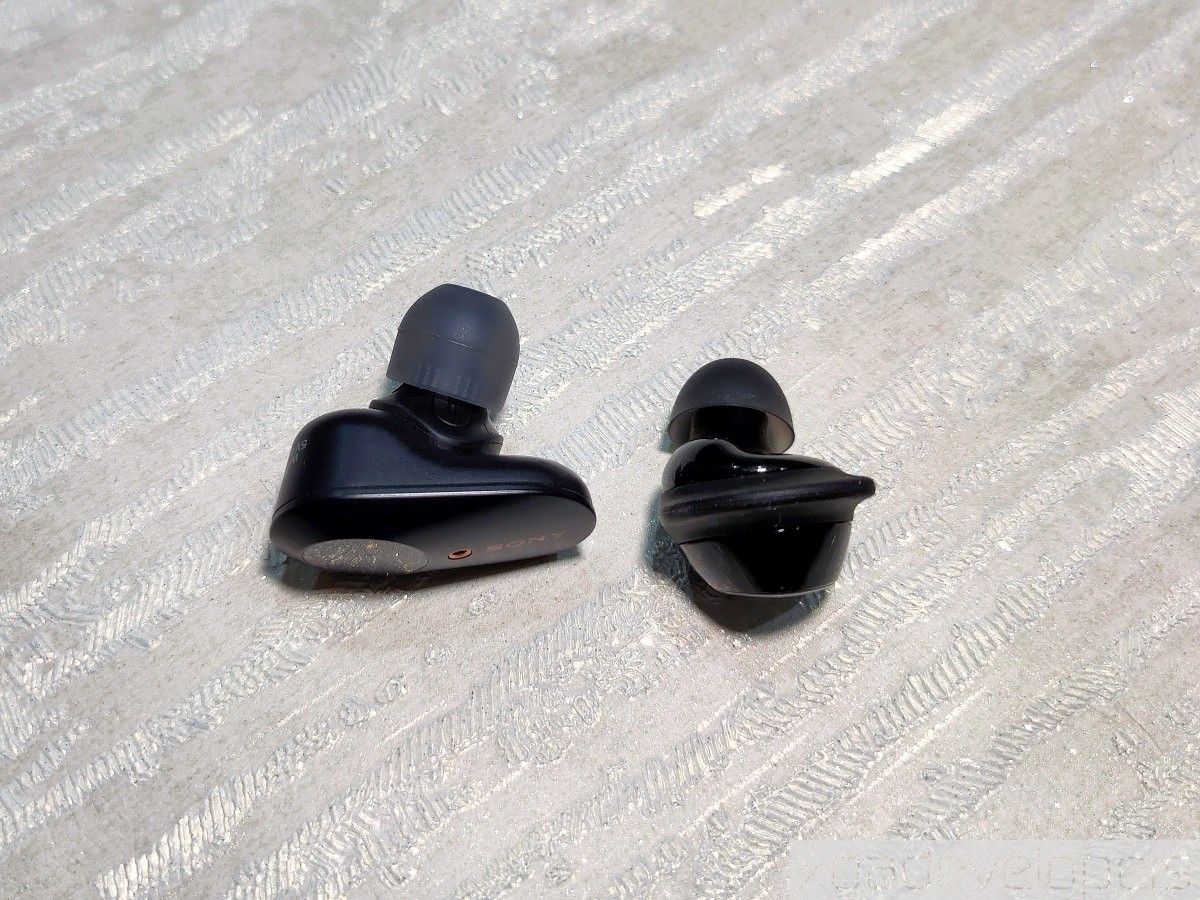
Unlike the Sony WF-1000XM3 that are bulkier (pictured above), I can actually rest my head sideways on a pillow with the Galaxy Buds+ in my ears and not have them push themselves deep within my ear or cause any discomfort. I’ve even managed to take a short nap with these on, which is a testimony to how effortless wearing these earbuds can be.

Samsung Galaxy Buds+ Samsung Galaxy Buds+ Samsung Galaxy Buds+

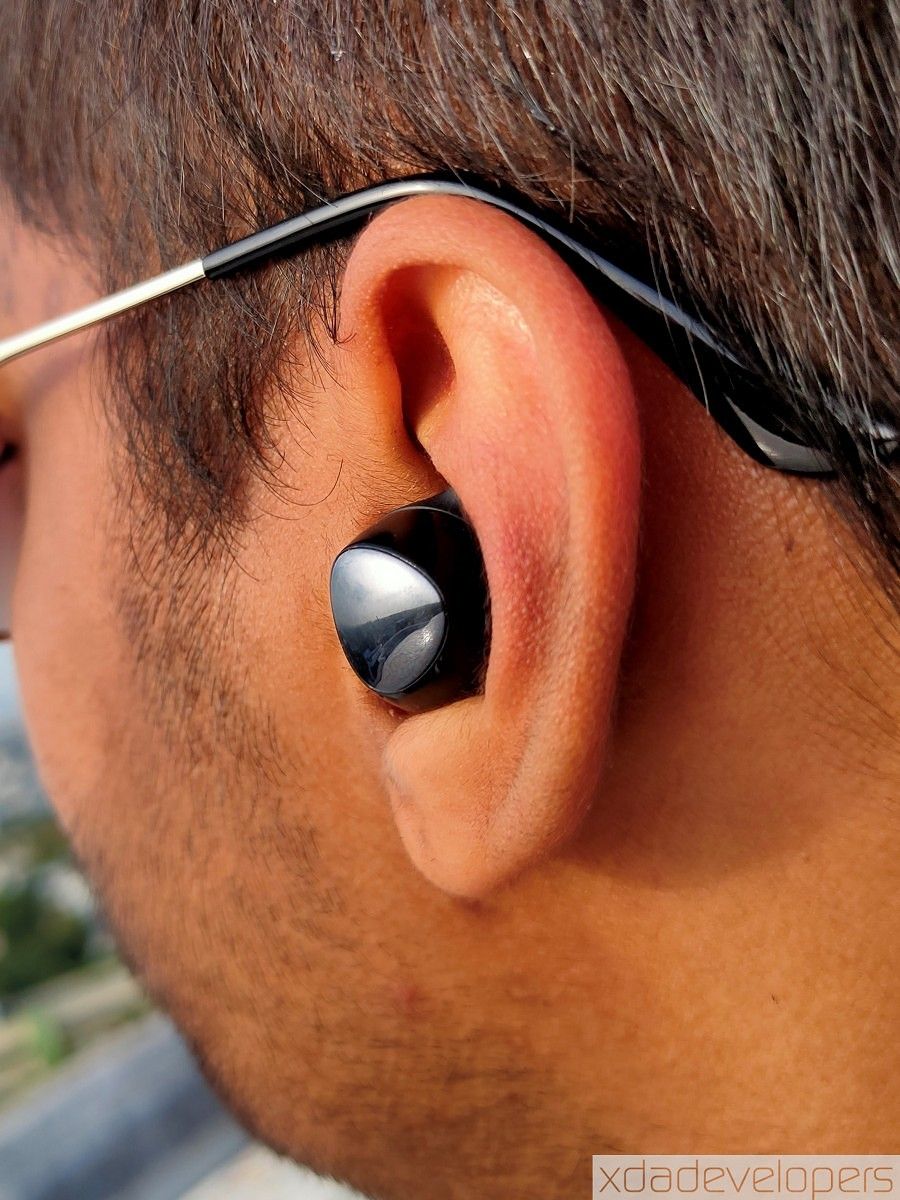
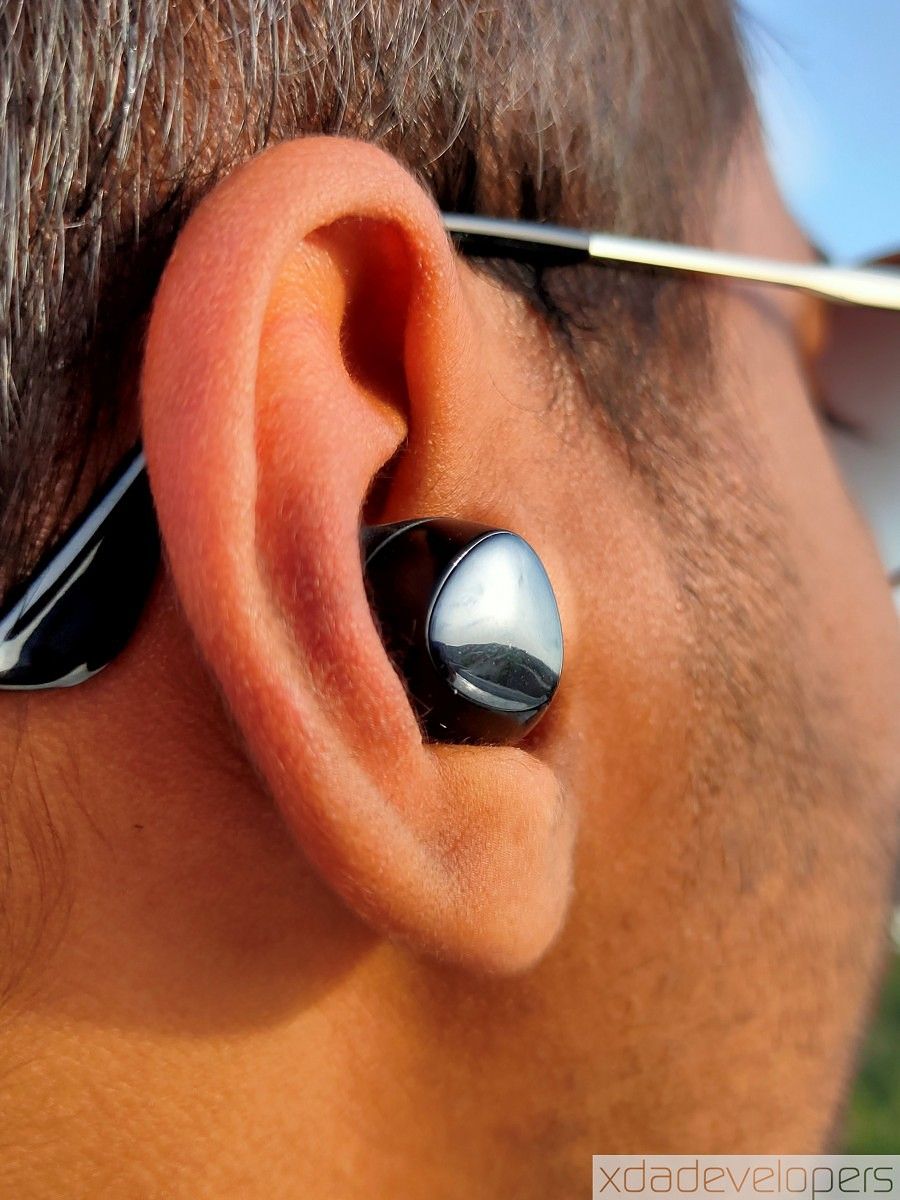
The fit on the earbuds is also great. Regardless of the wingtip chosen (S without the stabilizers, or M/L with the stabilizers), the Samsung Galaxy Buds+ sit deep within the ear and do not fall out even while walking around or doing light head movements. The included rubber tips do a great job of holding the earbuds in place within your ear canal and do a decent job with noise isolation as well. I have not had any instances of the earphones popping out of my ears or becoming unsettled, but there is a good chance that the shape of your ears will give you a different experience. Still, their overall small footprint and design coupled with the low weight and deep ear fit make the Samsung Galaxy Buds+ an excellent choice for earphones that you pop in your ears and forget about for a few hours.

As far as the case is concerned, the Samsung Galaxy Buds+ come in a pill-shaped case that snaps shut with the help of magnets to keep the lid closed. The Galaxy Buds+ rest within the case without any issues, as they should. If I had to nitpick, I would say that the magnetic snapping action of the earbuds when putting them back into the case is a little underwhelming and not as satisfying as the tight snap that happens with the Sony WF-1000XM3. Moving on, the size of the case feels perfect for pockets, which was a welcome change of pace for someone like me who came from the bulky WF-1000XM3 and its even bulkier case.

Samsung Galaxy Buds+

But as mentioned before, the full glossy finish of the Samsung Galaxy Buds+ case undermines the cost and makes it look borderline garish. In contrast, the case of the Sony WF-1000XM3 adopts a matte finish for a large portion of its surface area and just feels more premium in comparison (though the absolutely scratch-prone polished metal lid on the Sony’s is a big problem of its own).

Samsung Galaxy Buds+ vs Sony WF-1000XM3

The case has an LED indicator on the inside to indicate the charging status of the earbuds and another LED indicator on the outside to indicate the charging status of the case. Inside the case, there’s a rubber strip to indicate where the Left and Right earbuds are to be placed—it is easy to mistake the small bumps for some sort of buttons you can press, but they aren’t actually buttons as they cannot be pressed and provide no functionality other than for visuals.

The USB Type-C port exists below the hinge on the outside. You can use the port for charging the case or you can choose to wirelessly charge the case using a Qi-certified wireless charger. Wireless charging is a differentiating upgrade from the original Galaxy Buds, so if you have invested in wireless chargers, you will appreciate the added convenience that the Samsung Galaxy Buds+ brings into your life. But if you aren’t, Samsung also includes a standard USB Type-A to Type-C cable in the box, so you’re covered either way.

Samsung Galaxy Buds+ Samsung Galaxy Buds+

Another point to note: the Samsung Galaxy Buds+ have an IPX2 rating, which means it just resists light splashes of water. To put it into perspective, the Galaxy Buds+ can handle light sweat, but that’s about it. Because of this, it is not advised to wear them for any serious workouts or during rain.

To wrap it up, the Samsung Galaxy Buds+ have a very good, small, and lightweight design with an adequate, snug fit. The case is also compact and pocketable. Other than the glossy finish and the poor IP rating, I don’t have any major complaints about the design or build of this accessory. I hope Samsung takes notice of this feedback because the Galaxy Buds+ would have been close to perfect without the gloss!


Samsung Galaxy Buds+ — Features

Easy Pair

The Samsung Galaxy Buds+ come with a robust set of features. Starting off, the first pairing process is super simple: You just have to open the lid and the Galaxy Buds+ are already in pairing mode. Enter into pairing mode on your smartphone or other devices, click on the Galaxy Buds+ entry, and you are connected and good to go! You don’t need an app or account to sign in just to use the Galaxy Buds+ and its basic functionality, nor do you need to remember any complicated pairing gestures or actions. That’s a big plus (pun unintended) as it removes the friction from the onboarding process and makes these a good average-consumer-friendly product.

The pairing process only gets slightly complicated when you are pairing a second device while staying connected to the first one. In this instance, you need to disconnect from the previous device (preferably by turning Bluetooth off) and then either manually enter into pairing mode (tap once, and then tap and hold on the t0uch area) or place the buds back into the case and reopen the lid. This was admittedly a bit more cumbersome, but the pairing process still remains painless if the Galaxy Buds+ do not have an active connection. It’s great that they automatically enter pairing mode when they can’t connect to a previous connection. Note that the Galaxy Buds+ initiate a connection when the lid is opened, and the earbuds do not need to be pulled out to switch them on. Also, you can use a singular earbud too.

If you have a Samsung smartphone with the Samsung SmartThings app installed, the pairing process should be even easier. I do not have a Samsung device to test this out, though. Also, note that the Galaxy Buds+ also do not support Google’s Fast Pair.

Multi-device Switching

When the Galaxy Buds+ launched, there was some mild controversy regarding multi-device switching. This was a feature that was only available when switching between two Samsung devices that have the Samsung SmartThings app installed. SmartThings would then enable the user to tap within the media panel on each device to move the Galaxy Buds+ connection between two devices. However, a subsequent update brought multi-device support for non-Samsung devices.

Consequently, there is a lot less friction now to switch between two devices. This has immediately lifted the Galaxy Buds+ up in terms of convenience and utility against the Sony WF-1000XM3, as I can very easily switch between several phones and my laptop with little effort. But there is still room for improvement—for instance, I do hope the next iteration adopts Bluetooth multipoint and shifts audio focus intelligently.

Controls

The Samsung Galaxy Buds+ have a large touchpad (the glossy part) facing outwards. This can be tapped in various combinations to control different functions. A single tap on either bud plays and pauses tracks. A double-tap will play the next track and a triple tap will play the previous track. If a call is incoming, you can double-tap to accept and single tap and hold to decline. The Samsung Wearable app lets you reconfigure the single touch and hold command on the left and right earbud individually to any of the following four options: Voice command, Ambient sound, Spotify, or Volume Control (Right earbud for Volume Up, Left earbud for Volume Down). Note that the Galaxy Buds+ does not have auto-pause on removal/auto-play on insertion, even though they can detect when they are removed. On the flip side, you can’t really not touch the touchpad while removing or inserting the earbud.

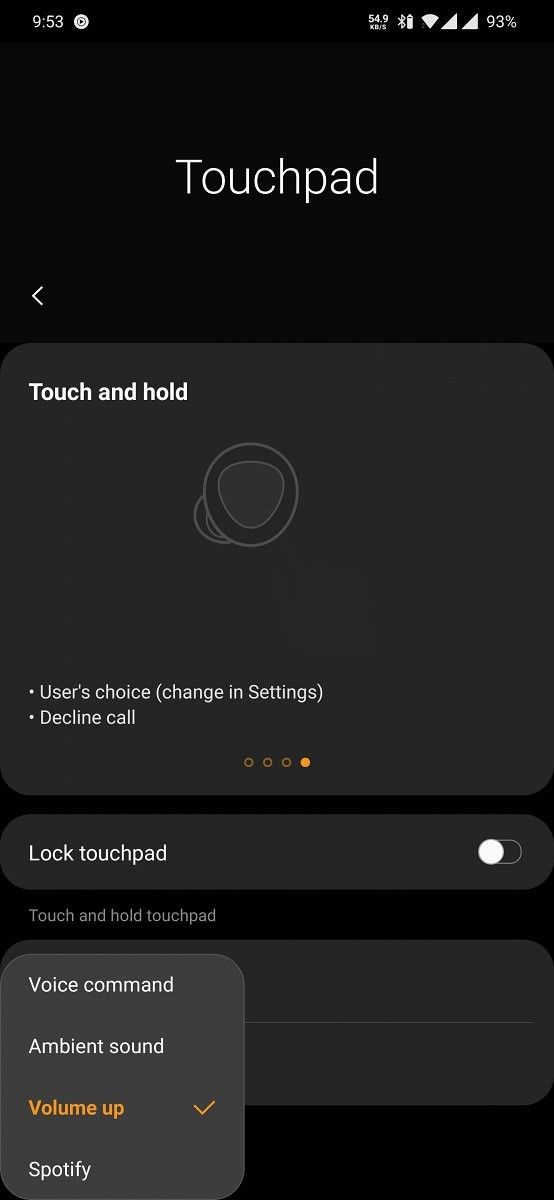
You can also choose to lock the touch and hold command. With the command locked, you can still control volume by enabling an experimental feature called “Double Tap Earbud Edge.” I found that this feature works best when you are hitting the underside of your ear and not touching the earbuds directly, but the overall gesture feels unnatural and forced, so it makes sense to have this under the experimental tab.

The Voice command control can trigger Google Assistant on my phone. The Spotify integration is also neat as you can launch and begin playing the last played playlist with a simple gesture.

Connectivity

The Samsung Galaxy Buds+ support Bluetooth 5.0 for connecting to devices. For codecs, both the Buds+ and the Buds support SBC, AAC, and the scalable Samsung codec (proprietary). You can only take advantage of the Samsung scalable codec on Samsung’s devices, and hence, an ecosystem lock-in becomes crucial to experience the best sound out of these earbuds.

In terms of wireless range, I can get an uninterrupted connection across the hallway, which is about 8-10 meters. Connection drops and audio crackling become more frequent if you have any walls in between. Performance is on par with other truly wireless solutions, so there’s nothing to really complain about here.

Latency is unfortunately noticeable on the Galaxy Buds+, especially while gaming. I am unable to put a number to the delay, but it is definitely noticeable. Still, the situation is not too bad for casual play, and you can make do with the Buds+ if you do not have a wired solution nearby.

Curiously, there is no gaming mode to be found within the Galaxy Wearable app on my OnePlus 7 Pro, however, an option for the same does show up on Samsung devices.

Galaxy Wearable App

The Galaxy Wearable app is a recommended download for unlocking certain customizations on the Samsung Galaxy Buds+, but you don’t necessarily need it for basic functions and controls.

Galaxy Wearable (Samsung Gear) (Free, Google Play) →

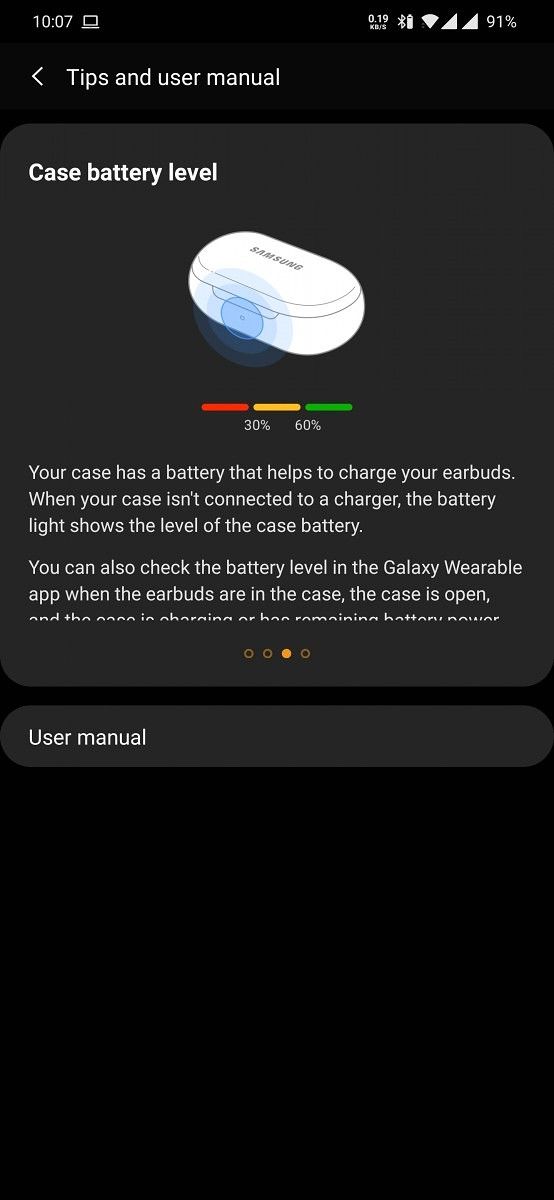
The app is primarily used when you need to read a precise measurement of the battery level on the individual buds and the case. You also need it to download and install firmware updates for the Galaxy Buds+. Some of these updates bring useful functions such as seamless connections, so I do recommend keeping the app installed and checking it regularly. You can also reset the earbuds from within the app.

There is also an equalizer within the app. However, you cannot fine-tune the settings or create a custom profile, which is a major oversight on a popular product like this. There are third-party apps that can do this, though.

Further, you can also have the Galaxy Buds+ read your notifications aloud to you. This can be done either in a summary format (just the name of the app) or in detail (with the notification content). You can set the feature up on a per-app basis, too.

The Galaxy Wearable app also has a Find My Earbuds feature which plays a loud beep on the earphones. Frankly, if you have actually lost your earbud, the feature is practically useless as you can barely hear the sound unless the earbud is within 10cm of your ears.

Ambient Sound

Within the Galaxy Wearable app, you can also toggle between various levels of Ambient Sound—a setting that amplifies the distracting sound around you. I fail to see why a user would want to use this setting since it downgrades the music listening experience without placing any particular emphasis on external voices.

You can, however, choose to have ambient sound turned on only for voice calls, and this is a setting I would recommend keeping in place. The noise isolation on the Galaxy Buds+ is quite good, and as a result, you may not realize how loud you are if you are on a voice call. Turning this setting on lets you realize how loud you sound to people around you, so the self-awareness helps you to modulate your voice accordingly.


Samsung Galaxy Buds+ — Sound Quality and Voice Quality

The Samsung Galaxy Buds+ have a 2-way speaker system along with a dedicated tweeter and woofer in each earphone for better treble and bass performance, respectively. Like several other Samsung audio accessories, they are also tuned by AKG. Curiously, Samsung does not actually detail the size of the driver used within the earbuds. Regardless, the Buds+ sound great. I consider myself an amateur in audio assessment and to my “average consumer” audio perception, the Galaxy Buds+ do an excellent job.

Using this thread from the Head-Fi forums as a reference, I would say that the Galaxy Buds+ have a higher reproduction on the higher ends. Samsung claims an improvement in bass response, but this improvement seems to be lost on me as I feel that the bass is still noticeably weak. For instance, the audio from the Halo theme does not sound as majestic as it should, and there is a lack of a “thump” and the sub-bass appears to be rolled off. The Bass Boost setting within the Galaxy Wearable app does improve the bass response but at the cost of higher-pitched notes. The relatively poor bass response may be a limitation of TWS solutions as a whole and not simply an issue with the Buds+. If you like your audio bass-heavy, such as Nucleya’s Laung Gawacha from Bass Rani, steer clear and opt for headphones instead.

Nitpicking on the bass aside, the Galaxy Buds+ have performed admirably on all other aspects. Vocals are a delight to hear, with clear reproduction and no noticeable muddling. Mids and highs are also handled very well. Music listening is an enjoyable experience on the Buds+ as far as audio quality is concerned.

What is a little disappointing is the lack of any form of noise cancellation on the earbuds. This is especially noticeable to me as I come from daily driving the Sony WF-1000XM3, which is generally recognized as the best active noise cancellation earbuds released in 2019. The Sony WF-1000XM3 does an absolutely amazing job of drowning out external noise and immersing you in the music. The Samsung Galaxy Buds+, on the other hand, rely solely on noise isolation with the rubber ear tips as there is no active noise cancellation at play. Active Noise Cancellation is the only reason why I still carry both sets of earphones around with me. Had the Samsung Galaxy Buds+ featured any sort of noise cancellation, I would have been comfortable leaving my Sony XM3s behind. The next Galaxy Buds X/ Galaxy Buds Live/ Galaxy Buds beans are rumored to come with active noise cancellation support, so I am definitely interested in seeing what Samsung brings to the table with their next-gen product.

The voice quality, though, is not disappointing. On the contrary, my experience with calls has been great. The inclusion of the third microphone is immediately noticeable to parties on the other end of a call. Voice calls, WhatsApp video calls, and Zoom meetings have gone without a hitch on the voice audio quality. To continue the comparison, the Sony WF-1000XM3 performs rather poorly on voice calls and people on the other end have described the sound as “distant” and “hollow”. With the Galaxy Buds+, people could not tell if I was speaking through a wireless earbud, and that’s a big thumbs up.


Samsung Galaxy Buds+ — Battery Life

The Samsung Galaxy Buds+ promises a battery life of 11 hours, and the company’s claims hold up for the most part. The maximum I have worn the Galaxy Buds+ during a single stretch was 9 hours, and it went through without needing to be popped into the case. The battery backup provided by the case is a little disappointing, as you can expect about a full charge just once again. Combined overall, the Galaxy Buds+ does have decent battery backup, and you should be covered for most use cases.

If you do manage to run out of battery, you can charge up through the USB Type-C port, a Qi-compatible wireless charger, or through Wireless Powershare. The addition of wireless charging is a nice touch on the earbuds, and it adds to the convenience of owning this pair of earbuds for users who have leaned into the wireless charging lifestyle. Simply place them on the charging mat and pick them back up again after some time.


Samsung Galaxy Buds+ — Concluding Note

My time with the Samsung Galaxy Buds+ has been very enjoyable, and I loved having these earphones around with me to get through the days in lockdown. These buds had to fill in the rather big shoes of the Sony WF-1000XM3, my daily drivers, and they managed to do a very good job. The only instances where I missed my Sony XM3s were in noisier environments for that sweet and effective Active Noise Cancellation feature, but that was to be expected because Sony set the bar very high and Buds+ completely lack the feature. I also miss having earbuds that are truly water-resistant, and that is something that is not up to the mark on both the Samsung’s and the Sony’s. The gloss on the Galaxy Buds+ case is a fingerprint magnet and is best left hidden in your pocket.

What the Galaxy Buds+ does excellently is everything else. The small design of the earbud causes practically no wear fatigue, a fact that makes them comfortable to wear for long periods of time. The sound quality is very good and so is the noise isolation, and the complaints on bass can be filed under nitpicking. The battery lasts for a long while, and when you do run out, you have a few options to make charging up easy. Plus, the voice call quality on the Buds+ has made them my default choice all through a workday and beyond. Samsung has made only a few changes over the original Galaxy Buds, essentially polishing a good product, and the result speaks itself. Things are even better if you own a recent Samsung Galaxy smartphone as you get the added benefits of tighter ecosystem integration.

Samsung Galaxy Buds+

Are the Samsung Galaxy Buds+ the best truly wireless earbuds on the market? That is a difficult question to answer, and without having tried the many popular alternatives on the market, I don’t feel confident enough to answer. At a price of ₹11,990 (~$158) in India and $149 in the USA, the Samsung Galaxy Buds+ are not cheap, and you are likely to find competitive solutions like the Jabra Elite Active 75t, Sennheiser Momentum TWS, and even the Huawei FreeBuds 3 around the same price range. But the biggest competitor to the Galaxy Buds+ is the Apple Airpods lineup. In India, the Apple AirPods Pro costs a cool ₹24,900 (~$329) while the second-generation AirPods with the wireless charging case costs ₹18,900 (~$250). Against these two, the Samsung Galaxy Buds+ is a better value product and does not disappoint in audio performance as well. The Galaxy Buds+ are one of the most recognizable and easy-to-recommend products in this segment for average users.

Buy the Samsung Galaxy Buds+: Samsung.in || Samsung.com

If you have a Samsung Galaxy smartphone, the Samsung Galaxy Buds+ is a good purchase for ₹11,990/$149, and an even sweeter deal if you can get them for lower.

The post Samsung Galaxy Buds+ Review: The Meaningful Increment appeared first on xda-developers.


from xda-developers https://ift.tt/3i8nPD9
via IFTTT

OnePlus 8 and 8 Pro Early Developments: Custom Kernels, Google Camera, and Hole-Punch Apps!

OnePlus is one of the few Android smartphone makers that still caters to the aftermarket development community. Despite its status as a “premium” smartphone brand these days, the company has promoted custom ROMs for EOL devices and maintains an active developer program. Now the company’s latest offerings — the OnePlus 8 and the OnePlus 8 Pro — have been blessed with some early custom developments, especially after OnePlus published the unified kernel source code. In this OnePlus 8 series development update, we will be listing all the custom ROMs, kernels, and mods that are now available for the phone duo.

OnePlus 8 XDA Forums ||| OnePlus 8 Pro XDA Forums

Buy OnePlus 8/8 Pro from Amazon.in (Affiliate)


Guides and Tools

How to root

So you have unlocked the bootloader of your brand new phone and planning to root? The following guides can help you to patch the stock boot image of your phone with Magisk and flash the modified version to gain root access. The guides also show you how to install OxygenOS OTA updates while keeping root intact. Thanks to XDA Recognized Developer mauronofrio for the guides!

How to root without a custom recovery: OnePlus 8 ||| OnePlus 8 Pro

Unbrick tool

Access to the official unbrick tool would be immensely helpful, as they allow you to restore your OnePlus 8 or OnePlus 8 Pro in case you accidentally brick it while tinkering. Commonly known as ‘MsmDownloadTool’, these tools can also be used to roll back to a previous version of OxygenOS if necessary. Thanks to XDA Portal supporter Some_Random_Username for sharing the unbrick tools!

Unbrick tool: OnePlus 8 ||| OnePlus 8 Pro

Enable VoLTE & VoWiFi

The OnePlus 8 lineup is officially compatible with several major telecom providers, but not all of them have whitelisted the models for advanced IMS services, such as VoLTE and VoWiFi. Fortunately, there is an easy way to enable those features right from your device. Credits go to XDA Junior Member LennARTpas for the tutorial!

Enable VoLTE & VoWiFi on the OnePlus 8 and OnePlus 8 Pro


Custom Kernels and Recoveries

Unofficial TWRP

Replacing the stock recovery with a custom recovery like TWRP is kind of a norm in the aftermarket development scene. It enables users to perform a full backup (including critical partitions) and flash custom ROMs as well as other mods on their devices. Owners of these phones should be pleased to know that an unofficial build of TWRP is already available, courtesy of XDA Recognized Developer mauronofrio.

TWRP Download and Discussion Thread: OnePlus 8 ||| OnePlus 8 Pro

ElementalX kernel

XDA Recognized Developer flar2 has ported his ever-popular custom kernel, ElementalX, to these devices. The kernel brings several improvements, including advanced color control, wakelock blocking, and WireGuard support among other things. Experienced users can fine-tune the kernel parameters using any standard kernel configuration app.

ElementalX kernel: OnePlus 8 ||| OnePlus 8 Pro

blu_Spark kernel

A familiar name in the OnePlus community, XDA Senior Member eng.stk received a developer unit of the OnePlus 8 Pro from the company and promptly brought his famous blu_Spark kernel to the phone. Besides featuring a plethora of enhanced performance and battery patches, the kernel supports CDROM emulation on mass storage, making it compatible with DriveDroid. Note that compatibility with the regular OnePlus 8 hasn’t been personally tested by the developer.

blu_Spark kernel for the OnePlus 8 series

CleanSlate kernel

Fancy using gestures? CleanSlate kernel by XDA Recognized Developer tbalden offers sweep to sleep and double/long tap on corner area gestures. The cherry on top, the companion kernel config app from the same developer can be used without root access. Try out the kernel on your OnePlus 8/8 Pro by following the instructions in the forum threads linked below.

CleanSlate kernel: OnePlus 8 ||| OnePlus 8 Pro

Radioactive kernel

If you are looking for a lightweight but feature-rich custom kernel, opt for Radioactive kernel. Developed by XDA Recognized Contributor acuicultor, the unified kernel brings in a WireGuard module, KCAL control, kernel-level live display support using K-Lapse, and any many more to both the OnePlus 8 and its “Pro” variant.

Radioactive kernel for the OnePlus 8 series

EviraKernel, FrankenKernel, and Omega kernel

XDA Senior Member resurrect prefers to create a balance between performance and battery life through Evira kernel (stylized as “EviraKernel”). The custom kernel was originally released for the OnePlus 8 Pro, but the developer added compatibility for the regular OnePlus 8 a few weeks ago.

EviraKernel: OnePlus 8 ||| OnePlus 8 Pro

FrankenKernel by XDA Recognized Developer dabug123 and Omega Kernel by XDA Senior Member kristofpetho offer a similar performance boost over the stock OxygenOS kernel. The latter is officially compatible with the OnePlus 8 Pro only.

FrankenKernel for the OnePlus 8 series

Omega kernel for the OnePlus 8 Pro

Kirisakura kernel

The CAF Upstream-powered Kirisakura kernel brings a number of security enhancements to the OnePlus 8 Pro, such as Kernel Control Flow Integrity (Kernel-CFI). The maintainer, XDA Recognized Developer Freak07, has also incorporated several useful functionalities from CleanSlate kernel.

Kirisakura kernel for the OnePlus 8 Pro


Custom ROMs

LineageOS 17.1

LineageOS is undoubtedly the most popular custom ROM out there, and it is now available for the OnePlus 8 Pro, thanks to the contributions of XDA Recognized Developer LuK1337. You can flash the unofficial build of LineageOS 17.1 on your OnePlus 8 Pro by following the instructions in the forum thread linked below.

Unofficial LineageOS 17.1 for the OnePlus 8 Pro

Paranoid Android

Much like LineageOS, Paranoid Android also has a huge user base. The popular custom ROM is now available as beta for the OnePlus 8/8 Pro. The ROM, which is based on PA Quartz 3 revision, comes with GApps preinstalled. Since it’s still in the early stages of development, there are some minor issues. Head over to the device-specific threads linked below and follow the instructions to get the ROM up and running on your device. Credits go to developers ZVNexusxboxfanjTheStrix, and sirhc for these builds.

Paranoid Android Beta: OnePlus 8 ||| OnePlus 8 Pro

CarbonROM

The team behind the popular CarbonROM custom ROM recently released its Android 10-based builds back in late April. The AOSP-based custom ROM is already available for nearly 20 Android devices, and now they’ve released early builds for the OnePlus 8 Pro. This build is made by XDA Recognized Developer Myself5 and you can grab it from the thread linked below.

Unofficial CarbonROM for the OnePlus 8 Pro

xXx NoLimits and ExOS

In case you don’t want to lose the stability of stock OxygenOS, you can choose between xXx NoLimits and ExOS. Unlike traditional custom ROMs, these are highly configurable Magisk modules in the truest sense of the term. One should flash them on top of the stock ROM to enjoy features like built-in ad blocking (via AdAway), ViPER4Android, and a whole lot of other useful goodies. xXx NoLimits is made by XDA Senior Member xXx while ExOS is made by XDA Senior Member jamal2367.

xXx NoLimits for the OnePlus 8 Series

ExOS for the OnePlus 8 series


Mods

Google Camera Port

Fans of the Google Camera app will be glad to know that a port is now available for the OnePlus 8 family of devices. The port is made by XDA Senior Member Urnyx05, and it reportedly works quite well. The telephoto and the ultra-wide-angle sensors are correctly recognized by this port, however, the macro camera on the OnePlus 8 is not supported as of now. Moreover, the resolution of the captured images is capped at 12MP due to the 4-in-1 pixel binning from the 48MP sensor.

Google Camera mod for the OnePlus 8 series

Unlock Dolby Atmos equalizer settings

XDA Senior Member Rayekk discovered a handy method to replace the barebones Dolby Atmos Settings on the OnePlus 8/8 Pro (as well as older OnePlus phones running Android 10) with a more feature-filled equalizer extracted from the Razer Phone. The good news is, you can apply this mod without root access.

Unlock Dolby Atmos equalizer settings on the OnePlus 8 series

Arc Lighting and Energy Ring

These two nifty apps can utilize the area around the front camera hole-punch cutout on your OnePlus 8 and OnePlus 8 Pro to display the battery status. Arc Lighting can also use the space as a notification indicator or displaying audio visualizations. Energy Ring is made by XDA Recognized Developer jagan2 while Arc Lighting is made by XDA Senior Member zzcool.

Arc Lighting for the OnePlus 8 series 

Energy Ring: OnePlus 8 ||| OnePlus 8 Pro

aodNotify and OPAodMod

Always on Display (AOD) is yet to be officially available on OxygenOS, but XDA’s talented developer community has got you covered. For example, you can pick up aodNotify, which also doubles as a notification light for your OnePlus 8. OPAodMod, on the other hand, is an Xposed Module that brings in a Google Pixel-like AOD feature. aodNotify is made by XDA Senior Member Jawomo while the OPAodMod is maintained by XDA Recognized Developer Quinny899.

aodNotify for the OnePlus 8

OPAodMod for the OnePlus 8 series


Keep an eye out on the XDA forums for more mods. While we were preparing this article, more and more threads kept popping up! The OnePlus 8 series is bound to be popular among the enthusiast community, and with more developers getting ready to publish their work, you’ll have plenty of interesting mods to tinker with.

The post OnePlus 8 and 8 Pro Early Developments: Custom Kernels, Google Camera, and Hole-Punch Apps! appeared first on xda-developers.


from xda-developers https://ift.tt/2ZkasqC
via IFTTT

Kirisakura custom kernel for the OnePlus 8 Pro enables Control Flow Integrity (CFI) for better security

OnePlus phones are quite popular among tinkerers, primarily because of the company’s developer-friendly attitude and of course, its painless bootloader unlocking policy. The company itself isn’t afraid to experiment and modders fully embrace the same school of thought. For example, OnePlus phones were the first few non-Pixel devices to support Energy Aware Scheduling (EAS) courtesy of XDA’s rich aftermarket development community. This is a big reason why third-party kernels are always welcome here at XDA, as they can be customized to introduce new performance features as well as security measures.

XDA Recognized Developer Freak07, better known as the maintainer of Kirisakura kernel, has now introduced a nifty security feature to the OnePlus 8 Pro through his custom kernel. The mechanism is called Control Flow Integrity (CFI), which is designed to be a runtime hardening feature, but could also be classified as a bug-finding tool – making it quite distinctive.

OnePlus 8 Pro XDA Forums

What is Control Flow Integrity and how is it related to hardening?

Improving security by fixing exploitable code is a very important aspect of kernel development. This, amongst others, is done regularly by the monthly Android security updates.

However, as we all know, these updates aren’t rolled out as regularly by all OEMs as we would like them to be. Additionally, the Android kernel consists of thousands and thousands of lines of code that are out of tree. Due to the complexity and size of the Android kernel, as well as the sheer diversity of the Android ecosystem, it’s difficult to fix every single exploit. Instead of fixing every single line of exploitable code, it’s beneficial to make the system more resilient against attacks by rendering the existing security bugs non-exploitable. This technique is called hardening.

That’s where Control Flow Integrity (CFI) comes into play. CFI is a security mechanism that disallows changes to the original control flow graph of a compiled binary. Due to existing memory protections that make code injection more difficult, a common attack vector is to overwrite a function pointer stored in memory.

Here is a technical explanation by Freak07 that explains a bit more about Control Flow Integrity:

Technical details about Control Flow Integrity

“The availability of a huge number of function pointers in the kernel assists the popularity of this attack pattern. Even if attackers cannot inject executable code of their own, arbitrary parts of existing kernel code can be executed to complete their exploit.

LLVM‘s CFI attempts to mitigate these attacks by restricting valid call targets and forcing a kernel panic when detecting a CFI violation. A check is added before each indirect branch to confirm that the target address points to a valid function with a correct signature. This prevents an indirect branch from jumping to an arbitrary code location and even limits the functions that can be called. An attacker will still be able to change a function pointer, if a bug allows access. But LLVM’s CFI limits 55% of indirect calls to at most 5 possible targets and 80% to at most 20 targets. In order to determine all valid call targets for each indirect branch, the compiler needs to see all of the kernel code at once.

The usage of LTO (Link Time Optimization) makes this possible. LLVM’s CFI requires the usage of LTO, where the compiler produces LLVM-specific bitcode for all C compilation units, and an LTO-aware linker uses the LLVM backend to combine the bitcode and compile it into native code.

Supplementary to permitting the usage of CFI, LTO achieves better runtime performance through whole-program analysis and cross-module optimization.

ThinLTO has nearly caught up to LTOs performance improvement. In ThinLTO mode, as with regular LTO, Clang emits LLVM bitcode after the compile phase. The ThinLTO bitcode is augmented with a compact summary of the module. During the link step, only the summaries are read and merged into a combined summary index, which includes an index of function locations for later cross-module function importing. Afterwards fast and efficient whole-program analysis is performed on the combined summary index. ThinLTO allows a multi-threaded linking process, which results in reduced compilation time.

Due to CFI interrupting program execution when hitting certain bug classes, it also classifies as a bug finding tool, as previously mentioned, when used in permissive mode. Permissive CFI will show CFI violations in the kernel log, without forcing a kernel panic. The core 4.9 (Pixel 3 generation devices) and 4.14 (Pixel 4 generation devices) kernels had several function type mismatches resulting in CFI violations, which were addressed by Google in patchsets available on the kernel/common repos.

However, due to the nature of the Android ecosystem, these mismatches are likely to be found in SoC manufacturer (in this case, Qualcomm) or OEM (OnePlus) specific code as well. Several CFI violations in Qualcomm-code distinct to the 4.19 kernel were fixed on the Kirisakura kernel for the OnePlus 8 Pro (example: 1, 2, 3).

Running the kernel in permissive CFI revealed CFI violations in code related to OnePlus drivers as well (relevant commits can be found here and here). Kirisakura kernel for the OnePlus 8 Pro runs with CFI enforced, protecting its users against this kind of code reuse attacks.”

The only Android smartphone models (that we know of) that officially support CFI are the Google Pixel 3 and Pixel 4 family. The developer tells us that his kernel is among the few custom kernels to have fully working Kernel-CFI. There is another kernel on the OnePlus 7 Pro forum that supports Kernel-CFI as well as Freak07‘s own Kirisakura kernel for the ASUS ROG Phone II, but his kernel release for the OnePlus 8 Pro is the first custom kernel for a device with Linux kernel version 4.19 to have CFI enforced.

Kirisakura kernel for the OnePlus 8 Pro — XDA Download and Discussion Thread

Google strongly recommends the usage of Kernel-CFI if the device is running Android 9 Pie or higher. With OEMs sometimes being months behind the most recent security update and our phones becoming more and more connected to our lives, holding valuable private data, security features that focus on hardening the system are indeed a welcome addition to our personal smartphones. There are other kernel security features that are as important if not more important than Kernel-CFI, though, so don’t take CFI as a magic bullet that protects from all flaws.

The post Kirisakura custom kernel for the OnePlus 8 Pro enables Control Flow Integrity (CFI) for better security appeared first on xda-developers.


from xda-developers https://ift.tt/3g58e5j
via IFTTT

samedi 27 juin 2020

The Razer Kishi controller can be easily modded to fit larger Android phones or phones in cases

Mobile gaming is getting more and more popular as smartphones continue to push the boundaries of performance. Over the past couple of years, we’ve seen a few AAA game publishers attempt to make their mark on the industry. The rise of console emulators and cloud gaming services is also improving choice for mobile gamers. Even though smartphones and data connections are more than capable of handling some decent gaming, playing with onscreen controls is just not optimal for many games. That’s where gadgets like the Razer Kishi come in. It’s a $79 telescopic controller that connects to your smartphone via its USB Type-C port to make it look like a Nintendo Switch with the joy cons attached. Unfortunately, the maximum dimensions of the controller limit its compatibility with some devices. As it turns out, there is a simple workaround for that.

The Razer Kishi is designed to extend so it can fit Android smartphones with a height between 145.3-163.7mm, a width between 68.2-78.1mm, and a depth between 7.0-8.8mm. Because of this, some larger devices like the Samsung Galaxy S20 Ultra, Huawei P40 Pro, and OPPO Find X2 Pro will either fit extremely awkwardly or not at all. Fortunately, a user on the /r/Stadia subreddit by the name of /u/totofra brought to our attention a very simple way around this problem. There are two rubber grips located at both ends of the controller; removing them increases the room between the pads and lets you use fit slightly bigger devices. The featured image at the top of this article shows a photo of the OPPO Find X2 Pro, a device with a height of 165.2mm, fitting snugly inside a Razer Kishi with the two rubber grips removed.


Keep in mind that the rubber grips were added to make sure your device doesn’t get scratched or wobble around while inside the controller. We recommend using a smartphone case or applying sticky pads to protect your phone and keep it from moving while you’re gaming. You do not need any tools to remove the rubber grips from the controller, though you may have some difficulties pulling out the rubber since it’s pre-installed pretty tightly. Once you do remove the rubber inserts, you can always reattach them in case you want to use the Kishi without a phone case.

The post The Razer Kishi controller can be easily modded to fit larger Android phones or phones in cases appeared first on xda-developers.


from xda-developers https://ift.tt/2BH2m3x
via IFTTT

AniWeather is a beautiful new weather app for Android focused on animations and simplicity

AniWeather, like its name suggests, is an animated weather app developed by one of our community’s legendary Substratum themers, XDA Senior Member llevo3. If by any chance the word “animated” conjures up images of tacky whirling lights or flashing graphics from a 1996 Geocities homepage, there is no need to worry – there is none of that here. The animations strike an excellent balance between subtlety and adding to the user experience. Another outstanding feature of AniWeather is its simplicity – there is no complex labyrinth of settings within settings or any cluttered array of obscure weather data. 

When you open the app for the first time, you’ll be greeted by a prompt asking you to grant permissions access to your phone’s location. Then you’ll see a simple two-step tutorial: The first step will show you how to access the settings by tapping on the umbrella icon and the second step will show you how to access the forecast and weather chart panels by swiping to the left. 

When you tap on the umbrella you’ll see the easy-to-use settings screen from which you can select between metric, imperial, and universal (degrees in Kelvin) units. If you want to entertain your Fahrenheit-using friends on social media, I suggest sharing a screenshot with units in Kelvin so the app will indicate the temperature in your city is around 300 degrees. 

When you open AniWeather for regular use after you’ve set your preferences, you’ll be greeted by a current conditions panel with the forecast for today and the next two days on the bottom, though you can actually swipe left on that bottom strip to see the next seven days. One swipe to the left on the main panel leads to an hourly forecast for the next 48 hours (swipe up and down to scroll). The hourly forecast includes basic weather descriptions for each hour, wind speeds, and temperatures. One more swipe to the left takes you to a more detailed forecast for the next seven days, which includes the aforementioned data sets from the hourly forecast and adds barometric pressure, UV index, and humidity levels. Swiping left from the seven-day forecast panel leads to the last available panel, which includes charts for temperature, precipitation, and wind speed.

What really sets AniWeather apart from the myriads of weather apps available on the Google Play Store is the simple, uncluttered design, the easy access to relevant data, and the stylish artwork from a once-prominent Substratum themer. Also, while Google does list the developer’s email for feedback and feature requests, I’d recommend using the app’s thread in our forums where you can also see teasers of upcoming features.

AniWeather XDA Forum Thread

AniWeather (Free+, Google Play) →

The post AniWeather is a beautiful new weather app for Android focused on animations and simplicity appeared first on xda-developers.


from xda-developers https://ift.tt/2YBfvUH
via IFTTT

Samsung Galaxy S20 and Razer Phone 2 receive updates with July 2020 security patches

Samsung’s flagship Galaxy S20 series has once again broken its own record of getting monthly security updates ahead of the Google Pixel lineup. Just like the previous month’s incident, the company has now been able to deliver the July 2020 security patchset to the regular Galaxy S20 as well as the “Plus” and “Ultra” variants. And in a bit of a surprise, the Razer Phone 2 has also picked up an unexpected OTA, which similarly bumps the Android security patch level (SPL) of the phone to July 2020.

Samsung Galaxy S20

At the time of reporting, the Korean 5G editions of the Galaxy S20 (model number SM-G98xN) are the only variants that have received the new update. Unlike the global models, these are powered by the Qualcomm Snapdragon 865 SoC, which means cross-flashing firmwares is impossible. The updated firmware, tagged as G98xNKSU1ATFD, brings in camera enhancements in zoomed-in shots and improves video stabilization. This update also deprecates the MirrorLink service, as mentioned by Samsung some months ago.

galaxy_s20_july_2020_ota

Credits to Twitter user @Kuma_Sleepy for the screenshot!

Galaxy S20/S20+/S20 Ultra Forums

Buy from Amazon.in — Samsung Galaxy: S20 ||| S20+ ||| S20 Ultra

Razer Phone 2

Amidst all the uncertainties with Razer’s smartphone business future, the new update for the Razer Phone 2 is indeed a breath of fresh air. The version number of the new build is P-SMR4-RC001-RZR-200616.3181, i.e. it’s the Android Pie-based MR4 update for the global variant of the device. The MR3 build came out nearly three months ago, thus the jump from March 2020 patch level to July 2020 is quite significant.

razer_phone_2_july_2020_ota

Thanks Rox for the tip!

Razer Phone 2 XDA Forums

Razer has yet to publish the updated factory image on their official download portal, so you have to wait for the OTA to hit your device. Galaxy S20 users, on the other hand, can use tools like Frija to download the new firmware straight from Samsung update server.

The post Samsung Galaxy S20 and Razer Phone 2 receive updates with July 2020 security patches appeared first on xda-developers.


from xda-developers https://ift.tt/38471bE
via IFTTT

Unlock More from Your Streaming Service with CyberGhost VPN

When looking for a VPN solution, it can be a little overwhelming with the number of options out there. The benefits of using a Virtual Private Network (VPN) every time you browse the Web have been widely established. These apps are the first and most important line of defense against hackers who are intent on stealing everything from your browsing history to your credit card information—a feat that’s made much easier when you’re using public WiFi.

But, not all VPNs were created equal. CyberGhost VPN is one of the fastest, most respected, and streamlined VPNs on the market, and right now you can subscribe for as little as $2.75 per month.

CyberGhost VPN is a feature-packed solution while being easy enough for first-time VPN users. Unlike most VPNs that inhibit your browsing speed and sap your bandwidth, CyberGhost VPN lets you browse at full speed on up to seven devices simultaneously. It offers 256-AES bit encryption across the board, top-tier protection against malware and cyber infiltrations, and access to over 6,400 secure VPN servers worldwide.

Moreover, CyberGhost VPN has dedicated apps for all platforms: Windows, macOS, Linux, iOS, Android, Apple TV, Android TV, Amazon Fire TV&FireStick, Xbox, PlayStation, and even for routers.

Stream your Favorite Shows from Anywhere in the World

Streaming services tend to have different selections of content for different parts of the world. What you see on Netflix in the U.S. could be totally different from what your friend sees in the UK. These geographic restrictions can sometimes make you miss out on content. Many countries even block entire streaming services, making traveling even worse than it already has to be.

CyberGhost VPN is the solution to unlock and bypass geographical restrictions. By routing your internet traffic through a server in another country, you’re unlocking all the streaming shows and movies that are available in that part of the world. This is particularly useful during the COVID-19 social distancing which has so many people staying indoors. There have been many times where I try to watch a movie with a friend from another country, only to find out that one of us doesn’t have it available. Now I can set my VPN to the country they’re in, and just like that, we can have access to the same content.

The streaming feature works with all of the major streaming services. This includes Netflix, Disney+, Amazon Prime Video, Hulu, YouTube Premium, and tons of other options. With the fast speeds of CyberGhost’s VPN service, you won’t run into additional buffering times while you’re watching your shows. Enjoy your content in its full quality with high-speed streaming.

Unlock the full potential of your streaming subscriptions

One of the best ways to utilize the streaming feature is to set up CyberGhost on your Android TV. CyberGhost is optimized for Android TV, and it’s as easy as downloading it to your TV from the Play store and logging in to your account. Your CyberGhost VPN account will support up to seven different devices, so you can use it on your TV, phone, PC, Xbox, and anything else you need.

CyberGhost for Streaming

Stay Safe on Public Wi-Fi Networks

Every time you connect to a public wifi network, you are at risk of having your data stolen. Without seeing the security behind a wifi router, you are trusting that everything is secure before you connect. Unfortunately, there’s really no way of knowing if you’re joining a poorly secured wifi or not. Hackers use insecure wifi spots to try to access victim’s computers.

By encrypting your connection with CyberGhost VPN, you’ll have a secure connection when using public wifi. Once you’re behind a VPN, an attacker won’t be able to monitor your internet activity. All they will see is one connection between you and the VPN. This protects you from many different types of attacks that are aimed towards people with vulnerable connections. These types of attacks include:

  • Man-in-the-Middle Attacks
  • Denial of Service Attacks
  • Evil Twin Attacks
  • FTP Brute Force Attack
  • FTP Bounce Attack
  • MAC Spoofing
  • Packet Capture
  • Port Stealing
  • Cookie side-jacking
  • Nasty worms

It’s better to be safe than sorry. If you fall victim to one of these types of attacks, it could cost you quite a bit and end up being a massive headache. Don’t wait to be a victim, and start using CyberGhost VPN.

CyberGhost Connection Features

Torrent Files without Being Tracked

Torrenting is a very popular way of downloading large files, software, and media. When you torrent a file, your IP gets added to the network of seeders and leechers. This list of IPs can be seen by anyone downloading or seeding that particular file. This leaves you vulnerable to anyone looking to log your IP, and associate it with that particular file.

If you’ve ever used the software PeerBlock, you’d be able to see for yourself just how many government and private companies are trying to track your IP. Once you start a download, a list of dozens of known government IPs popup trying to track you. There’s no telling what these organizations could be doing with your information.

Torrenting involves a connection called P2P or peer to peer. Not all VPN services support these types of connections, but CyberGhost VPN fully supports this feature so you can be secure in all of your online connections. Download torrents without worrying about who’s watching you.

CyberGhost for Torrents

CyberGhost VPN is a great option for a complete online privacy solution. Sign up today using our affiliate link below. It’s a very affordable option with some of the best features you’ll find in any VPN service.

The post Unlock More from Your Streaming Service with CyberGhost VPN appeared first on xda-developers.


from xda-developers https://ift.tt/3i80Ec4
via IFTTT