Apple revealed the MacBook Pro 13 (2022) and MacBook Air (2022) during the main keynote of WWDC22. These latest additions to the great Mac line further prove that a slim form factor can still pack immense might. They’re both relatively thin and light, but they also differ in many aspect. For example, the MacBook Air takes advantage of the modern notebook design we first saw on the 14/16-inch MacBook Pro (2021) — which you can buy as refurbished for a cheaper price tag. Meanwhile the MacBook Pro 13 (2022) sticks to the classic chassis and misses out on the MagSafe port and thin bezels. This the MacBook Pro 13 (2022) vs MacBook Air 13 (2022) — the battle between two M2-powered Apple notebooks.
Apple MacBook Pro 13 (2022) vs Apple MacBook Air 13 (2022): Specifications
Apple MacBook Pro 13 (2022)
Apple MacBook Air 13 (2022)
Processor
Apple M2 (8-Core CPU)
Apple M2 (8-Core CPU)
Graphics
Apple M2 (10-Core GPU)
Apple M2 (8-Core GPU)
Apple M2 (10-Core GPU)
Body
11.97 x 8.36 x 0.61 inches
3lbs
11.97 x 8.46 x 0.44 inches
2.7lbs
Display
13.3-inch Retina display (2560 x 1600), up to 500 nits peak brightness, True Tone technology
13.6-inch Liquid Retina display (2560 x 1664), up to 500 nits peak brightness, True Tone technology
Ports
Two Thunderbolt 4 ports
Headphone jack
Two Thunderbolt 4 ports
MagSafe 3 port
Headphone jack
Storage
256GB
512GB
1TB
2TB
256GB
512GB
1TB
2TB
Memory
8GB
16GB
24GB
8GB
16GB
24GB
Battery
58.2Whr battery
Up to 20 hours of video playback
67W charger
52.6Whr battery
Up to 18 hours of video playback
30W charger
Audio
Stereo speakers with wide stereo sound and spatial audio support when playing Dolby Atmos content
Four-speaker sound system with wide stereo sound and spatial audio support when playing Dolby Atmos content
Camera
720p FaceTime HD camera
1080p FaceTime HD camera
Connectivity
Wi-Fi 6
Bluetooth 5.0
Wi-Fi 6
Bluetooth 5.0
Color
Silver
Space Gray
Silver
Starlight
Space Gray
Midnight
Price
$1,299
Starts at $1,199
Design: Recycled ideas vs a fresh start
In the design department, the differences are pretty obvious. Back in 2021, Apple introduced a brand new notebook design, starting with the MacBook Pro 14/16 models. This change has finally made it to the Air line, with the MacBook Air 13 (2022) being the first to adopt it. The MacBook Pro 13 (2022), on the other hand, settles for the classic design from older MacBook Pro models. It features a Touch Bar but misses out on the MagSafe 3 charging port.
The MacBook Air is lighter and thinner. However, it has a slightly wider build due to its larger 13.6-inch display. Nonetheless, both devices share the same Thunderbolt 4 ports (two of them) and 3.5mm headphone jack. Notably, the Air features two additional finishes — Midnight and Starlight — while still offering Space Gray and Silver.
Display: Air has seen the light
A modern Apple redesign means a likely inclusion of The Notch somewhere. The MacBook Air 13 (2022)’s overhaul is no different. We get a slightly larger, notched 13.6-inch Liquid Retina display with notably thinner bezels. The MacBook Pro 13 (2022) sticks to the the 13.3-inch Retina display with large black bezels framing it in a very obvious manner. It’s shocking to see a device that looks as revolting in 2022, but the Cupertino overload clearly couldn’t care less.
Those seeking the modern-looking screen and bigger size should go for the MacBook Air 13 (2022). If you’d rather stare at the thick bezels instead of the notch, you can settle for the MacBook Pro 13 (2022) instead. Ultimately, both displays are decent in terms of clarity and brightness, with the MacBook Pro having a slightly higher pixel density (227ppi versus 224ppi).
Performance: Similar, yet different
Both the Apple MacBook Pro 13 (2022) and MacBook Air 13 (2022) pack the all-new M2 chip. They both support the same memory and storage capacities. However, the MacBook Air has a fanless design. So it throttles the performance of the M2 when it starts heating up. On the other hand, the MacBook Pro has a dedicated cooling system to avoid the throttling. So if you plan on executing intensive tasks, go for the Pro. You also get two extra hours of video playback on a single charge if you go for the Pro model.
Bottom Line: The Air offers more for less
From many most perspectives, the MacBook Air 13 (2022) shines over the MacBook Pro 13 (2022) — despite being a $100 cheaper in the U.S. You might want to consider buying the Pro model if you plan on challenging the power of the M2 chip. Additionally, the Pro has a Touch Bar — which plenty of users’ workflows depend on. Otherwise, the Air has a larger display, thinner bezels, a better webcam, a MagSafe 3 charging port, a minimalistic design, more color options, a lower price tag, etc.
Personally, I will be going for the MacBook Air 13 (2022) rather than MacBook Pro 13 (2022). That’s because I don’t typically cause my Mac to overheat — even without a dedicated cooling system. As a result, I don’t need the resilience of a MacBook Pro, and I get to enjoy the cleaner design, Air-exclusive Midnight finish, MagSafe charging, and much more.
Apple revealed the all-new MacBook Air (2022), along with macOS Ventura, during the main keynote of WWDC22. This welcome addition to the Mac lineup packs the latest M2 chip. This means apps for Apple silicon will perform best on this computer — as they’re specifically optimized for this processor. Apart from the upgraded M2 SoC, this MacBook features a more modern chassis design. It looks similar to that Apple introduced on the notched 2021 MacBook Pro models. Notably, it also adds new color options. The available finishes for the MacBook Air M2 (2022) are Midnight and Starlight — in addition to the familiar Space Gray and Silver. Now you must be wondering where you can buy this $1,199 Apple notebook from. These are the best deals for the MacBook Air M2 (2022).
The best MacBook Air M2 (2022) deals
Best Buy
The MacBook Air (2022)’s listing is live on Best Buy. It’s available in several hardware configurations, including finish and storage option varieties. Best Buy also allows you to pay through monthly installments — if you’re not ready to pay for it in one go.
The MacBook Air M2 features a redesigned, modern chassis that reintroduces the MagSafe port. It's available in four colors to choose from, and you can view its listing on Best Buy.
Adorama is also offering this new Mac in several configurations and colors to choose from. If it’s your retailer of choice, you can get 1,199 reward points if you buy the base model of the MacBook Air.
The MacBook Air M2 features a redesigned, modern chassis that reintroduces the MagSafe port. It's available in four colors to choose from, and you can view its listing on Adorama.
The Apple Store is the official place to get the MacBook Air from. It’s available in all finishes and hardware configurations. Additionally, you get to choose the physical keyboard’s language and have the company (for an additional fee) preload Final Cut Pro or Logic Pro. Lastly, you also get the option to pay through monthly installments, not to mention the 3% cash back if you purchase it with Apple Card.
The MacBook Air M2 features a redesigned, modern chassis that reintroduces the MagSafe port. It's available in four colors to choose from, and you can view its listing on the Online Apple Store.
It’s always a wise idea to buy new products — especially expensive ones — from authorized and official retailers. This way you’re guaranteed to receive a genuine, unused device. While some places might have tempting price tags, keep in mind that you mind end up with a fake product.
Which of the four MacBook Air finishes will you be going for? Let us know in the comments section below.
The Kindle Paperwhite is the best e-reader in the Kindle lineup, and for good reasons. It’s reasonably priced and is better than the barebones Kindle in almost all areas, featuring a sharper, brighter display, longer battery life, and a premium design. The newer Paperwhite 11th Gen has an even bigger display, and in some regards, it even beats the flagship Kindle Oasis, packing USB-C charging port and wireless charging support. But is the Kindle Paperwhite waterproof?
Is the Kindle Paperwhite waterproof?
The short answer is: yes, the Kindle Paperwhite is waterproof, with the term very loosely used here. The device has an IPX8 rating which makes it water-resistant. That means the Kindle Paperwhite can be safely used around water — if you understand the limitations. You can take it near a swimming pool, dunk it in a fish tank, and even wash it with tap water once in a while as part of your cleaning and maintenance routine. However, it’s also important to understand the limitation and caveats here. An IP rating doesn’t make a device immune to water, and the same is true for Kindle Paperwhite. Amazon notes that the Kindle Paperwhite can survive immersion in 2 meters deep water for up to 60 minutes and up to 0.25 meters of seawater for up to 3 minutes. However, it’s not recommended to immerse the device in salt water, soapy water, or other corrosive liquids.
If your Kindle Paperwhite gets wet or is immersed in water, let it fully dry before attempting to charge it. Don’t use an external heat source to dry the device. Instead, let the device dry by standing it upright and keeping it in a well-ventilated area. You should also not expose the Kindle Paperwhite to pressurized water, high-velocity water, or extremely humid conditions.
And while the Kindle Paperwhite is water-resistant, it doesn’t have any protection against dust. But this isn’t a big deal and something that can be solved by putting on a folio case. Check out the best cases for the Kindle Paperwhite. And note that not all Kindle Paperwhite models are water-resistant. Only the Paperwhite 9th Gen, 10th, Gen, and 11th Gen models have an IPX8 rating.
Bottom line
So yes, the Kindle Paperwhite is water-resistant and can withstand water splash or a short immersion in fresh water. However, you should avoid exposing the device to saltwater and other corrosive liquids.
Samsung is bringing Android 12 with One UI 4.1 to four more A-series smartphones this week, growing its portfolio of handsets that feature the latest version of Android. The devices being updated are the Galaxy A22 5G, Galaxy A21s, Galaxy A03s, and the Galaxy A02s.
Galaxy A22 5G
The 4G edition of the Galaxy A22 picked up the Android 12 update back in May. Now, the Galaxy A22 5G is receiving a taste of Android 12 with One UI Core 4.1 in the form of software version A226BXXU4BVF7. So far, it’s the SM-A226B variant to which the new build has started rolling out in Thailand and Malaysia.
It appears the Android 12 update for the Galaxy A21s is only available in Russia, Taiwan, and Hong Kong at the moment, but it should roll out to additional markets in the coming days. The latest firmware version is identified as A217FZHU8DVF6, which is meant for the SM-A217F model.
The same update of Android 12 with One UI Core 4.1 is also rolling out to the Galaxy A03s (model number SM-A037F) and Galaxy A02s (model number SM-A025F, SM-A025M) in select regions. For the Galaxy A03s, the software version is A037FXXU1BVFB and it is available across several Asian countries. The Galaxy A02s, on the other hand, has received the new build in the form of build A025FXXU4CVF4 in Russia and A025MUBU4CVF4 in Panama.
All of the updated firmware releases include the June 2022 security patch, according to the release notes. Notably, the aforementioned devices skipped One UI 4.0 and jumped directly to 4.1.
As always, the updates are rolling out in batches. Having said that, if you are no stranger to PC-based flashing, you can skip the waiting queue. To do so, grab the latest release directly from the company’s Firmware Update Server (FUS) and flash it manually on your Galaxy device.
In addition to playing music and managing a bunch of smart home devices, your Echo speaker can act as an audio output device for your smartphone. That’s right, you can connect your Android phone or an iPhone to your Echo speaker via Bluetooth to use it as a speaker. You can then use the Echo speaker to play media files that are stored on your phone or while watching a movie or a TV show. In case you wondering how to set that up, then here’s a step-by-step guide explaining how to connect your Android phone or an iPhone to Amazon Echo:
Before you can connect your Echo speaker to your Android phone or an iPhone, you’ll first have to make sure the speaker is set up and ready to go, meaning it’s registered to your account and is online. If you are new to the world of Echo speakers, then here’s how you can do it:
Open the Amazon Alexa app on your phone and log in to your account. You can download the Alexa app for free on both Android and iOS using the links below:
After that, plug in your Echo speaker and open the app to see a pop-up telling you that your new speaker is ready for setup. Select continue to proceed with the setup.
If you don’t see the pop-up, then open the app and select Devices from the menu at the bottom.
Choose the Plus icon on the top right corner of the screen.
After that, select Add Device option and choose Amazon Echo from the list.
Now, simply follow the on-screen instruction to select the network and authenticate it to allow Alexa to register your device to your network.
The setup process for your Echo speaker is the same for both Android phones and iPhones, so you can follow the steps and screenshots shown above regardless of the phone you have. Once your Echo speaker is set up and ready to go, you can now follow the steps mentioned in the sections below to connect your Android phone or an iPhone to an Echo speaker.
How to connect your Android phone to Amazon Echo
Before you can connect your Android phone to an Amazon Echo speaker, you need to make sure the speaker itself is registered to your network and is ready for a connection. If you navigated directly to this particular step without setting your Echo speaker then follow the steps mentioned in How to set up your Amazon Echo speaker section above, before connecting your Android phone.
Now that your new Echo speaker is set up and ready to go, you can go back to the Devices section in the app and select Echo & Alexa option on the top.
On this page, select your Echo speaker to open its settings page.
Inside, you’ll see a status tab that’ll show you the Wi-Fi network and the Bluetooth devices to which the speaker is connected.
Tap on the Status tab and select the Bluetooth Devices option on the next page.
Select Pair a new device option to make Alexa search for new Bluetooth devices.
As Alexa is searching for new devices, go to the Bluetooth settings on your phone and look for new Bluetooth devices.
Select your Echo speaker and accept the pairing request to pair your Echo speaker.
You can now use your Echo device as a Bluetooth speaker for your Android phone. Also, the next time you want to connect your phone to the speakers via Bluetooth, you can simply ask Alexa to connect to your phone. In this case, we can just, “Alexa, connect to Karthik’s S22 via Bluetooth” to connect instead of going through a manual process.
How to connect your iPhone to Amazon Echo
To connect your iPhone to an Amazon Echo speaker, you first have to make sure your speaker is set up and ready to go. If it’s not, then follow the steps mentioned in the How to set up your Amazon Echo speaker section above to register your speaker to the network.
Once the speaker is online, follow these simple steps to connect your iPhone to the Echo speaker via Bluetooth:
Select your Echo speaker from the Devices section and choose the connect a device option to start pairing with your iPhone.
Now, select the Pair a new device option to make Alexa search for devices.
While the assistant is searching for new Bluetooth devices, go to the Bluetooth settings in your iPhone and select your Echo speaker to connect.
Once connected, you’ll see your iPhone in the list of paired devices in the Alexa app.
And that’s it, you’ve now successfully connected your iPhone to your Echo speaker, meaning it’s now ready to output audio from your iPhone.
We used an Echo Dot 4th gen speaker in this tutorial, but the process is essentially the same for all the Echo speakers. Alternatively, you can also connect your Android phone or iPhone to your Echo speaker using a 3.5mm cable. A lot of the new Android and iOS devices, however, don’t have a headphone jack, so you may not be able to use this method without a dongle.
The developers behind the NewPipe open-source YouTube client have released a new update for the app. The latest release (v0.23.1) brings playback improvements thanks to DASH support, along with several bug fixes. In a blog post regarding the update, the team reveals that the DASH support should result in the app feeling a whole lot faster. Following the update, videos should load faster, and you should see a noticeable performance improvement while seeking through videos.
Along with DASH support, NewPipe 0.23.1 fixes repeated buffering while playing YouTube videos, lets users view recently ended YouTube livestreams, and introduces support for more resolutions and formats. Check out the section below for a list of all the significant changes in the latest release.
NewPipe 0.23.1 changes and bug fixes
Now DASH is used as the preferred means for YouTube playback instead of progressive HTTP, improving loading times in playback and seeking. This has made the app faster by an order of magnitude! No more waiting after tapping on a YouTube video!
According to some users, repeated buffering while playing YouTube videos also seems to have become an issue of the past.
Recently ended YouTube livestreams are now fully playable, right from the beginning.
In YouTube, some more resolutions and formats are now available for playing.
Fixed seeking on PeerTube videos with only HLS streams (that is, most PeerTube videos). Now PeerTube is finally usable!
Fixed crash on PeerTube videos with an audio-only stream.
Fixed playback of SoundCloud HLS-only tracks.
The blog post further adds that the team won’t release a new build of NewPipeExtracter along with the latest update, even though most of the changes mentioned above were made to the NewPipeExtractor. Furthermore, it notes that following the update users should be able to convert a remote playlist into a local NewPipe playlist. The release also brings a few more improvements and bug fixes, and you can learn all about them by clicking on the source link below.
Microsoft has updated the preview version of Windows Terminal to version 1.15, bringing along a couple of significant improvements to the user experience. First off, there’s now the ability to use mark mode to select text using the keyboard.
By pressing Ctrl + Shift + M, users can enter mark mode, and once it’s enabled, you can hold Shift while pressing the arrow keys to select text. You can also press Ctrl + A to select all the text in the Terminal’s buffer. It’s a seemingly small improvement, but if you’re used to selecting text with the keyboard in other apps, it can be very beneficial.
In addition to this, Windows Terminal Preview 1.15 adds experimental support for scroll marks, so you can more easily find something specific in your terminal history. Scroll marks can be navigated using terminal actions to jump directly to a specific mark, or you can also enable the ability to see scroll marks on the scroll bar so you can manually search for the text you want. As mentioned, this feature is still experimental and Microsoft warns that it’s subject to changes, but it’s certainly another welcome addition for those that heavily use the Windows Terminal.
This release also comes with a few smaller improvements, including support for the DECPS escape sequence, which allows users to play sounds through the terminal, plus new keyboard accelerators for the Windows Terminal’s shell extension, so you can use keyboard shortcuts to open files or folders in Terminal, Terminal Preview, or Terminal (Dev).
Alongside the Windows Terminal Preview 1.15 release, Microsoft has also made the previous preview version, 1.14, available in the stable channel. This version includes the ability to set a single background image for Terminal layouts with multiple panes, spreading the image across the panes. It also packs some visual changes to various elements of the UI, including tabs, the scrollbar, and more to bring it more in line with the Windows 11 design language.
You can update Windows Terminal Preview through the Microsoft Store, or download it using the link below if you’re interested. You can also install the stable channel of Windows Terminal, though it should be pre-installed on Windows 11.
All recently released Kindle e-readers come with a built-in front light, which you can activate when reading at night or in the dark. If you like to read at bedtime, the blue light emitted by the white front light may disrupt your sleep or lead to eye strain.
Thankfully, some Kindle models come equipped with Warm Light that adds a nice yellow-orange tint to the display for a comfortable reading experience. Similar to your phone’s night mode, the feature cuts down on harsh blue light. Here’s how to activate it.
Which Kindle e-readers support Warm Light?
Unfortunately, only select Kindle models support Warm Light.
Apart from the above two models, the feature isn’t currently available on other Kindle e-readers. Since the Warm Light feature requires a series of amber LEDs in addition to the white LEDs for the front light, it can’t be backported to older models with a software update.
How to activate Warm Light on Kindle
If you own a Kindle Paperwhite 11th Gen or Kindle Oasis (2019), you can enable the Warm Light feature in a few steps.
To enable Warm Light from the home screen, tap on the drop-down arrow. If you’re reading a book, tap anywhere in the top portion.
Below the Quick Actions toggles, you’ll see a slider for adjusting warmth.
Drag the warmth slider or tap on the Plus or Minus buttons to adjust the screen temperature.
The screen will turn yellowish or orangish depending on the intensity of warmth you’ve set.
You can also set an automatic or manual schedule for Warm Light. To enable it, bring down the Quick Actions panel and tap on the Schedule button next to the warmth slider. Select Automatic if you want to have Warm Light gradually change with sunset and sunrise. Or, use the manual mode to create a custom start and end time for warm light.
Prolonged exposure to blue light at night is shown to decrease the level of melatonin, a chemical that controls sleep and wake cycles. This could disrupt your sleep schedule and make it harder to fall asleep. If you like to read on your Kindle at bedtime, use the Warm Light feature to cut down on the hard blue light. If your Kindle doesn’t support the feature, you can use dark mode to reduce eye strain at night.
Xiaomi’s flagship phones are really good, and devices like the Xiaomi 12S Ultra can easily compete with anything made by Apple or Samsung. Xiaomi’s budget phones are also among the most affordable and reliable Android devices around. But it is arguably in the mid-range segment — that sweet $300 to $500 spot — where Xiaomi truly leaps ahead of the pack by offering significantly better value than anyone else.
The Poco F4 fits that description to a tee (by the way, I am aware that Poco markets itself as an independent brand separate from Xiaomi in some regions, but let’s not kid ourselves here). At a starting price of around $410, it obviously can’t compete against, say, Samsung’s $1,200 Galaxy S22 Ultra, but it mops the floor with Samsung’s $450 Galaxy A53 5G, or anything else from anyone under $500 for that matter. It’s a solid phone to buy in the mid-range, although it may not present enough improvements over its predecessor to warrant a year-on-year jump.
Poco F4: Specifications
Specification
Poco F4
Build
Corning Gorilla Glass 5
Colors: Moonlight Silver, Night Black, Nebula Green
About this review: Poco sent me an F4 for testing. This review was written after eight days of using the device. Poco did not have input in this review.
Poco F4: Price and Availability
The Poco F4 is on sale now in select European markets, as well as in Asian regions like India and Hong Kong. The device comes in two RAM/storage variants, which are priced as follows:
6GB + 128GB: €399
8GB + 256GB: €449
Poco F4: Hardware and Design
The Poco F4, to the layman, looks as good and premium as any flagship phone. It’s a glass slab, with thin bezels wrapping around a 6.67-inch 120Hz OLED display. The panel is bright and vivid, supporting HDR10+ and has Dolby Vision certification.
Around the back is a triple camera system, and the phone is powered by a Qualcomm Snapdragon 870 chip that supports 5G, with LPDDR5 RAM and a decent-sized 4,500 mAh battery. The haptics are precise and strong. If I hand the Poco F4 and, say, an iPhone 13 or Galaxy S22 to my middle-aged mother, she wouldn’t be able to tell why the Apple and Samsung devices are considered “more premium.” The point I’m trying to make is that the Poco F4 can pass for a modern flagship to the untrained eye.
I find the back design a bit bland, but it's also inoffensive
But those who are more familiar with smartphones will spot tells, like the fact this sandwich is not a glass-aluminum combo, but glass-plastic. The fingerprint scanner is embedded into the power button instead of being burrowed underneath the display. The screen is also “only” 1080p and not 2K (this doesn’t really matter), and the refresh rate is locked to 60Hz, 90Hz, or 120Hz instead of being able to dynamically adjust itself.
The fingerprint scanner is embedded into the power button on the right side of the device.
But you do get stereo speakers, 67W fast charging (charger included), and an IR blaster. I do find the back design a bit bland, but it’s also inoffensive. The overall in-hand feel is comfortable, with the 7.7mm thickness and 195g weight among the thinner/lighter end of modern Android phones.
Cameras
This triple camera system is more like a double camera system. The 64MP, f/1.8 main camera is very good for the price, and the 8MP, f/1.9 ultra-wide is solid, though the field of view is narrower than other Xiaomi phones at 119 degrees. That third lens, however, is a 2MP macro sensor that produces shots that are neither macro-enough nor usable. The 20MP selfie camera is the usual hole-punch affair, but it is impressively small compared to other Android hole punches.
The Poco F4 hole-punch (top) and the Galaxy S22 Ultra hole-punch (bottom).
Photos captured by the main camera with good lighting look sharp. The 1/2-inch sensor isn’t large by any means, but Xiaomi’s software processing does a good job producing a shot that is well detailed and exposed.
In low light conditions, you will have to rely on night mode to compensate for the small-ish image sensor and dated sensor, and night mode does do a good job of producing a well-lit and balanced shot, if not looking a bit over-processed. But the ultra-wide camera is so lacking in resolution and image sensor size that even night mode won’t change much. This is an ultra-wide camera that’s best reserved for daytime use.
That selfie camera is the same story as ultra-wide: fine during the day, but at night really struggles.
The Poco F4 can record videos up to 4K/60, but there’s virtually no stabilization at that setting. Shoot at 4K/30 and you get some decent (for its price range) EIS. These video quality obviously can’t compete with Android flagships, but it’s better than most phones under $500, except for the iPhone SE 3.
Poco F4: Performance and Software
The Poco F4 runs on the Qualcomm Snapdragon 870. This chip is a year old, but it’s actually two years old because the 870 is a souped-up rehash of the Snapdragon 865. Still, considering the 865 was a top-of-the-line SoC just two years ago, it’s still more than powerful enough today, especially for a sub-$500 device. This octa-core CPU, combined with the UFS 3.1 storage and LPDDR5 RAM, lets the phone zip around without issues. I didn’t experience dropped animations or apps taking a beat longer to launch as I did on Samsung’s Galaxy A53.
The Snapdragon 870 with UFS 3.1 storage and LPDDR5 RAM lets the phone zip around without any issues
The Poco F4 also continues Xiaomi’s trademark of giving its phones flagship-level haptics all the way down to the $250 range. With Samsung, Huawei, or OnePlus phones, you get precise, top-notch haptics at the flagship level, but for anything below $600, you’re getting mediocre mushy haptics. With Xiaomi, you’d have to get to the sub-$200 devices before you get an average vibration engine. Great haptics aren’t exactly marketable, but they’re part of little things that add up to more than the sum of their parts. Kudos to Xiaomi for not skimping here.
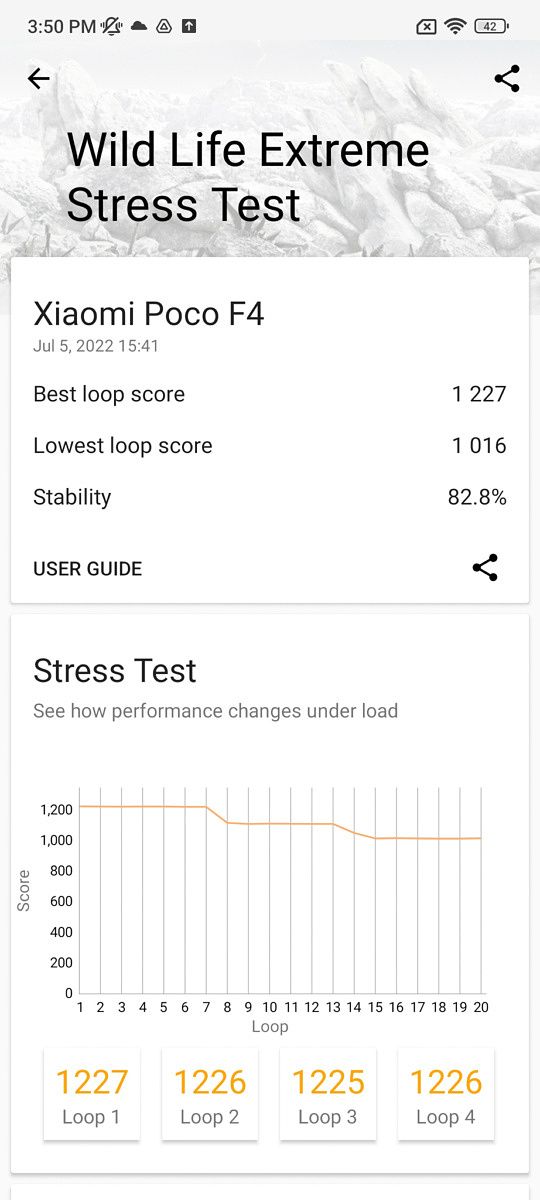
Benchmark scores are solid, and the phone was able to pass the 20-minute Wild Life Extreme Stress Test on 3DMark, while the scores aren’t the highest, stability was acceptable.
Software
I suppose part of the reason the Poco F4 feels fast is that MIUI is a well-optimized software with zippy animations. Running over Android 12, the MIUI 13 here performed like any other Xiaomi or Poco phone in the past, so it’s a software experience that strays a bit from how Google does things, but has its own unique character. Not everyone is a fan of MIUI’s whimsical touches (like an app “exploding” into bits when it’s uninstalled), but I don’t mind them. You have an app tray, a one-hand mode, and various shortcut gestures like quickly grabbing a screenshot with a three-finger swipe down.
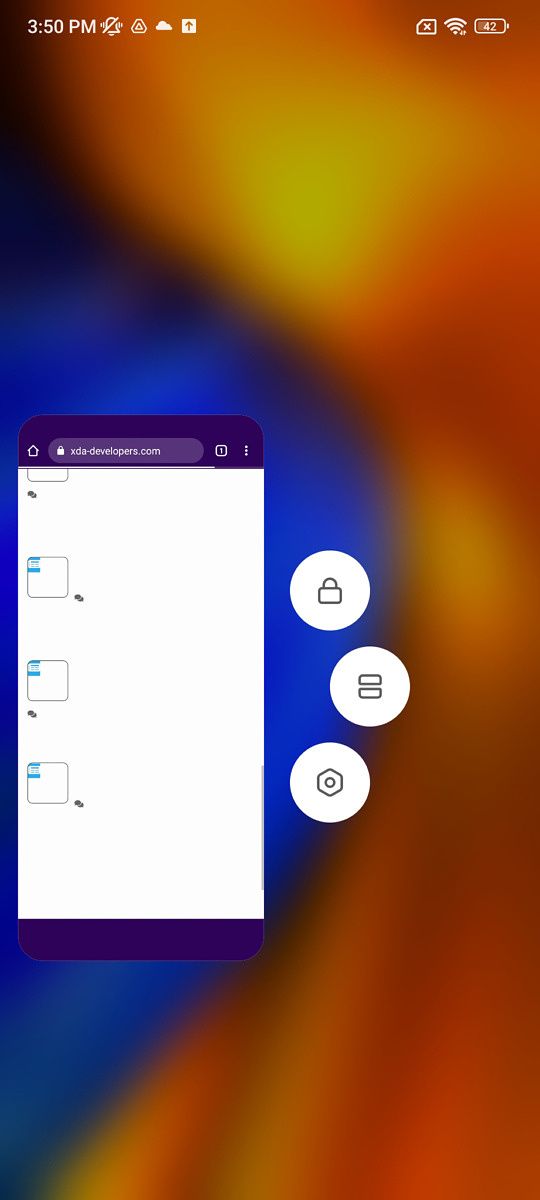
There are some nitpicks to be had: the MIUI here cannot open apps in floating windows. Other Xiaomi phones running MIUI can do this, so it may be Poco wanting to simplify the UI, or trying to keep the software from doing too much to bog down the older SoC. There’s also quite a bit of bloatware in this European model of the Poco F4, with Amazon, Facebook and a couple of games already pre-installed onto the phone.
Gaming
Those who follow Poco may be aware that this is the second device named F4 from the brand this year, as there was already a POCO F4 GT released in April that was a gaming phone. Well, this F4 can handle gaming quite well too thanks to the LPDDR5 RAM, UFS 3.1 storage, and an app called “Game Turbo” that prioritizes the phone’s resources to running mobile games. Game Turbo also lets you turn off notifications, or disable swipe gestures
Battery life
Battery life is a bit below par. The 4,500 mAh battery can’t quite power the 120Hz panel all day, especially since I leave the refresh rate at 120Hz and I’m a heavy user. On average I get about four hours of screen on time with about 10 hours of total use before the phone dips below the scary sub-5% mark. At least the phone supports fast 67W charging and the charger is included.
Poco advertises that the 67W charger can top up the phone from 0-100% in 38 minutes. I have not done an entire 0-100% charge, but I marked down these charging stats: 11% to 53% in 15 minutes; and 7% to 86% in 25 minutes. These numbers are fast and indicate that the Poco F4 shouldn’t be too far off from the advertised charging speeds.
Miscellaneous thoughts
The dual-firing speakers are located at the top and bottom of the display, so audio output is even (instead of one speaker located in the earpiece like many Android phones). This, along with the flat panel and relatively boxy design makes for a good video-watching machine around the house, as the phone is easy to securely hold with one hand.
Should you buy the Poco F4?
If you’re looking for a new Android phone and your budget is under $500, then I’d say go for it. The Poco F4 is clearly better than the Galaxy A53, which runs on a weaker processor, with significantly slower software and inferior haptics, and about similar display and main camera quality. You also get a charger and a case with the Poco F4, which matters to those on a budget. But before pulling the trigger on the purchase, remember that the Poco F3 still exists.
The Poco F4 isn’t a major upgrade over the Poco F3, which is still very good and available for about a hundred dollars less give or take. And to be fair, most phones are not great year-on-year upgrades, which is why OEMs end up discounting predecessors or discontinuing them altogether. The Poco F3 is available, so you may want to weigh your decision around.
And if you’re okay with using an iPhone or thick bezels, then the iPhone SE 2022 runs on a more powerful silicon, and the superior Apple app ecosystem, although you’re sacrificing a lot of modern smartphone technology like an OLED screen, thin bezels, and ultra-wide camera by going with the iPhone SE.
Ultimately, I think the Poco F4’s biggest competition is itself (or rather, the Xiaomi umbrella of brands). The Poco F3 is still here as mentioned, and there’s also the Poco X4 GT that launched at the same event as the Poco F4. There was also a Poco F4 GT earlier that costs a bit more, not to mention the myriad of Redmi devices, and a rumored version of a Xiaomi 12 Lite.
I guess when Xiaomi says it wants to offer “innovation for everyone,” it literally meant releasing a phone at every price range down at the hundred dollar mark. There’s a $300 Xiaomi phone, a $400 device, a $500 device, a $600 device, and so on. The Poco F4 is the best $400 phone, but Xiaomi’s $300 and $500 phones are also here vying for your attention too.
If you do end up choosing the Poco F4, you will not be disappointed. After all, it’s still a great value smartphone, and Xiaomi knows how to make those very well.
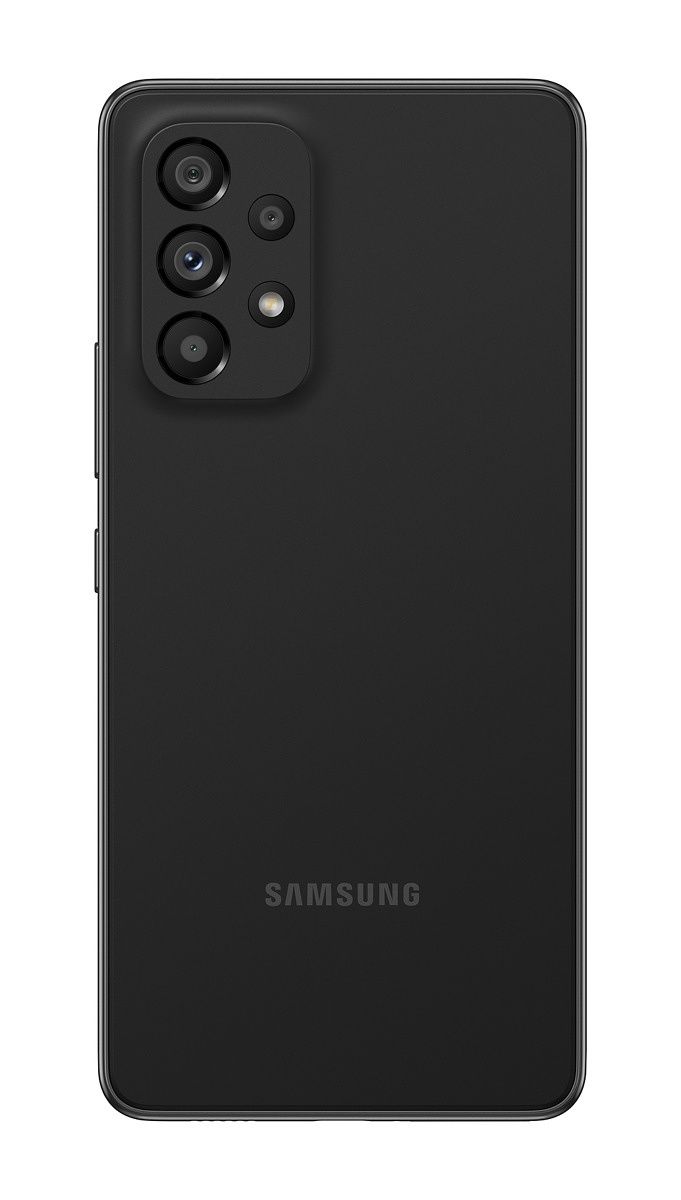
The Samsung Galaxy A53 5G is Korean tech giant’s answer to the iPhone SE, and it’s one of the best value smartphones of 2022 so far — particularly in the North American market. For its sub-$400 price, the phone offers a vibrant Samsung AMOLED screen that stretches the entire face of the device, with 120Hz refresh rate to boot. While the ultra-wide cameras are just average, the main camera is quite capable day and night thanks to Samsung’s improved computational photography algorithms. The huge 5,000 mAh battery is also a major selling point, as it’s large enough to power the phone all day for even the heaviest of users, thanks to its efficient Exynos 1280 SoC. It’s also one of the most comfortable phones to hold due to its lighter form factor and flat-ish design, and there’s even IP67 water- and dust-resistance.
While the Galaxy A53 supports dual physical SIMs for unlocked models (carrier models do not) and also an SD card for memory expansion (this is available for all models), some consumers may wonder if it also supports eSIM (electronic SIM), the relatively new technology in which the SIM data is entirely virtually “embedded” into the device so consumers don’t have to insert a physical SIM card.
Unfortunately, no, the Samsung Galaxy A53 5G does not support eSIM, so inserting a physical SIM card is the only way to get data connectivity on this device. This makes sense, considering the Galaxy A53 5G is a mid-ranger, and mid-range phones are more likely than a flagship model to be purchased unlocked and used as a shorter-term phone or a secondary phone, which means the ability to quickly swap SIM cards is beneficial. Electronic SIMs, for all their benefits right now, still require a bit of time and effort to move from one device to another — you’ll usually have to contact a carrier to request the switch.