In some ways, iOS and Android have become relatively similar operating systems. However, there are still plenty of differences between the two. One of the things I miss about Android is audible full battery notifications — which aren’t available by default on iPhones. There is a way to enable them, though, for both low and full battery instances. Here’s how to set an audible battery notification on iPhone.
How to set an audible battery notification on iPhone
Launch the Shortcuts app on your iPhone.
Click on the Automation tab in the bottom navigation bar.
Tap Create Personal Automation.
Scroll through the list and click on Battery Level.
This is the part where you have to decide if you want it to be a low or full battery notification. You can set the slider accordingly.
For a full battery notification, drag the slider to the extreme right and select Equal 100% in the list below it.
For a low battery notification, drag the slider to the left, until it shows the desired percentage, such as 20%. Select Falls Below 20% from the list below it.
Click Next in the top right corner.
Tap the search bar at the bottom of the screen.
Search for Notification.
Select Show Notification from the list.
Tap on the arrow icon next to Hello World to expand it.
Type Battery Alert in the Title field. You can obviously assign it any other name as you desire, but I prefer being descriptive with my titles.
Make sure the Play Sound option is toggled on.
Select Hello World, delete it, and type Your battery is low. or Your battery has been fully charged. — depending on the automation you’re building. You can also change the text to be anything else that you want.
Click on Next in the top right corner afterward.
Turn off Ask Before Running, and confirm after you get prompted. Otherwise, the feature won’t work as it would prompt you with an inaudible notification requesting manual permission to run the automation, defeating the entire purpose.
Click Done in the top right corner.
Voila! Now whenever your phone’s battery is low/full, you’ll get an audible notification.
You can create two automations for each of the low/full battery instances. Just follow the same steps and tweak the second automation accordingly.
I personally find audible battery notifications useful, as the system doesn’t notify me when my iPhone’s battery is full by default. Additionally, the current low battery pop-up alerts only notify you when you’re using your phone. If you put your device aside, you won’t know when the battery drops to a certain low level. Also, these automations allow you to choose your own percentages, rather than defaulting to Apple’s 20% and 10%.
Will you be using Shortcuts Automations to receive audible battery notifications on your iPhone? Let us know in the comments section below.
WhatsApp is one of the most widely used instant messaging services across the globe. Whether you’re texting a friend or creating a group chat with members of your family, WhatsApp is generally the preferred app since almost everyone uses it. Apart from texting known people, you may encounter several instances where you have to message certain unsaved phone numbers via WhatsApp. I’ve had instances where delivery executives from courier companies have asked me to share my GPS location on WhatsApp so that they can navigate to my house easily. In such scenarios, a quick hack to message unsaved numbers on WhatsApp comes in handy.
Ideally, I wouldn’t want to store someone’s number as a contact if I don’t know them personally or do not need to contact them more than once. Sharing my profile picture or status updates with a stranger is not really a wise thing to do, which is why we’re here to help you message unsaved phone numbers via your Android phone. Apart from privacy concerns, you might just be lazy to go through the entire process of adding a new contact just to send a single message or share your location. Here are some ways in which you can message unsaved phone numbers via WhatsApp on your Android device. These are quick and easy solutions that get the job done just fine. If you use an iPhone instead of an Android device, we have a separate guide on how to message unsaved WhatsApp numbers on iOS.
How to Message Unsaved WhatsApp Numbers on Android via an App
The simplest and fastest way to send a message to an unsaved number is via an app from the Play Store. It’s called Click to Chat. It’s an extremely minimal and lightweight application whose only functionality is to help you send messages to unsaved numbers. Here’s how you can use it.
Download the Click to Chat app from the Play Store on your Android smartphone.
Open the app and you will be greeted with an overlay asking you to enter the phone number of the person you want to message via WhatsApp.
Enter the desired phone number in the text field. you can either enter it manually or paste the phone number from the clipboard.
Make sure you also enter the relevant country code of the phone number you’re sending a message to.
Once you’ve entered the phone number, all you have to do is tap on Open. The app will start a conversation on WhatsApp with the entered number.
How to Message Unsaved WhatsApp Numbers on Android via a Link
If you don’t want to install a third-party app to do the job, WhatsApp offers a direct way of messaging unsaved phone numbers via a link. While this is also quite simple, it just involves an additional step of entering the link in your web browser first. If you prefer this method since it’s directly affiliated to WhatsApp unlike a third-party app (which also uses an official API), here’s how you do it.
Open any web browser on your Android smartphone and enter the following URL in the address bar: https://ift.tt/32D33YM
Replace all the ‘X’s in the URL with the phone number you want to message. Note that the first two digits have to be the corresponding country code.
For example, if I want to message the number “1234567890” in India, my link would look like this: http://wa.me/911234567890 since +91 is India’s country code.
Once you enter the link, hit Go. You will be redirected to a webpage with the option Continue to Chat.
Tap on it and you will be redirected to WhatsApp where you will now be able to message the phone number.
These were two easy ways in which you can message unsaved numbers on WhatsApp via your Android phone. There are several third-party apps that can do this, but Click to Chat is one that I’ve personally been using for a few years now and the reason I prefer it over others is that it’s light, ad-free, uses the official API, and works flawlessly. However, it’s not directly affiliated to WhatsApp in any way so if you don’t trust third-party apps, you might want to use the second method.
Messaging unsaved numbers is quite common and is a basic feature that WhatsApp needs to add natively to the app. Even after years of existence, there are some basic features that WhatsApp lacks and it’s amusing as to why they wouldn’t add them. Just like how multi-device support was added recently, we’re hoping WhatsApp would let users message unsaved numbers directly from the app shortly.
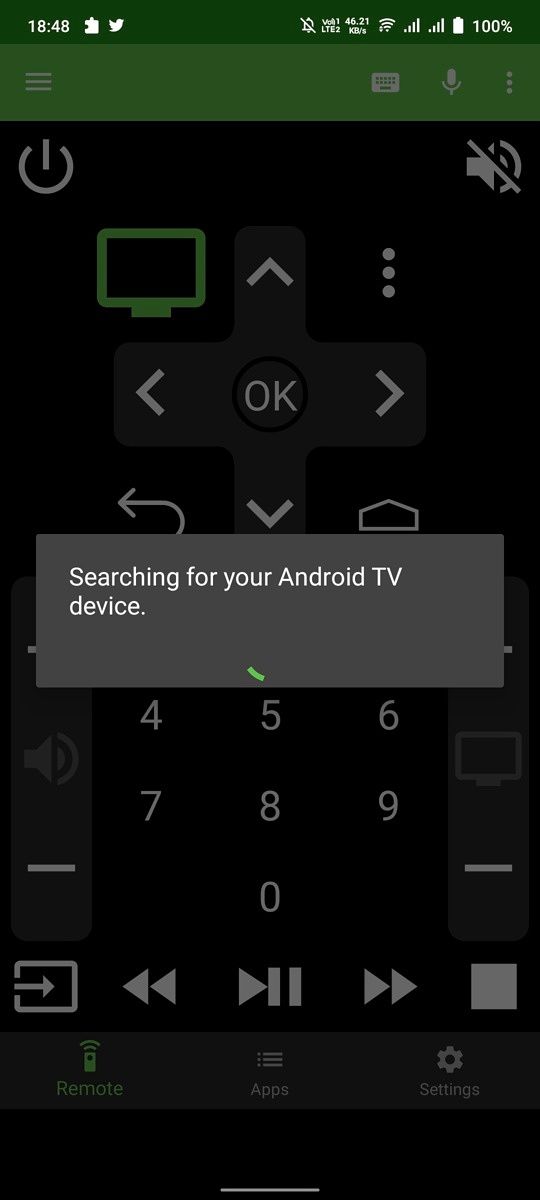
Losing your remote control is never fun, especially when all you want to do is sit back on your couch and enjoy your favorite show. Thankfully for Android TV users, Google offers a fallback option in the form of a virtual remote that you can find in the Google Home app. While it’s a handy option when your remote is lost, it’s quite basic in terms of what it can do. This is where “Android TV Remote” comes into play.
Android TV Remote is an unofficial remote app for your Android TV devices. It comes from the same developer that made Freebox Remote, which recently came to the spotlight, as it can also be used on Google TV devices. But using the Freebox Remote app to control an Android TV device requires a workaround, so the developer decided to release a standalone app that does exactly that.
Android TV Remote is a pretty straightforward app and works with pretty much all Android TV versions. All essential buttons, including a D-pad, are present on the main screen. In addition, the app also has a dedicated Apps list that lets you launch your favorite streaming service with a single click.
The current version lacks widget support. Hopefully, this is something that can be added in a future update, allowing users to control their Android TV/Google TV device without having to open the app.
Google used to offer a dedicated app for controlling Android TV devices on your local network. However, the company pulled the app from Google Play Store this year and has slowly been porting its features to other apps. The Google TV app gained a remote control back in September, with the Google Home app picking up the same feature a month later.
If you want to give the Android TV Remote app a shot, you can download it from the Google Play Store by following the link below.
The Apple Watch is one of the company’s greatest products and a device that dominates the wearables domain. Whether you’re looking for a fitness companion or more than just that, there’s an Apple Watch for you. This smartwatch is packed with features and sensors, and plenty of people aren’t sure where to start or how to make the most out of it. Whether you’ve bought or received one as a gift, our aim is to help you get started. Here are the first 10 things to do with a new Apple Watch.
When you first pair an Apple Watch with an iPhone, you must learn how to navigate around watchOS. Just like on iOS, a swipe down from the top of the screen will show the notifications. Swiping up from the bottom of the screen will show the Control Center. There you will be able to add, remove, and reorder the toggles based on your preferences. A swipe to the right or left on the main screen will switch between the added watch faces.
When it comes to hardware, the Apple Watch has a side button and a digital crown. A single click on the side button will show the recent or favorite app — depending on your settings. A double click will reveal the cards saved in Apple Wallet. Holding the side button will bring up a menu that includes the power button, Medical ID, and Emergency SOS.
The digital crown is used to scroll through lists and zoom in/out on certain elements. If you click it, though, It will show you the installed apps if you’re on the main screen. If you’re inside an app, it’ll take you to the main screen instead. Finally, double-clicking it will take you to the most recently used app. It might sound like a complicated mechanism, but your muscle memory will adapt faster than you’d expect.
2. Choose a watch face
Apple Watch watch faces
Choosing a watch face that matches your taste and style is one of the first things you should do after getting an Apple Watch. The company provides you with diverse options to choose from. However, it still doesn’t support custom watch faces. So you’re limited to the ones available on watchOS by default. To change it, just go to the Watch app on your iPhone, click on the Face Gallery tab in the middle of the bottom navigation bar, and click on the face you like. Once you’re in a face, you’ll get to customize some aspects about it, such as the colors and complications. When you’re done with that, tap on the Add button, and it’ll instantly change on your watch. You can have as many watch faces as you want, and you can easily swipe between them (horizontally) on your watch’s main screen.
3. Select the complications that matter to you
Apple and third-party developers offer plenty of complications to take advantage of. What are complications? See them as watch face accessories that provide timely information or shortcuts to certain apps. Care about the weather? There’s a complication for that. Interested in certain stocks? There’s also one for that. Curious about the sunrise/sunset times? You’ve got it!
The number of complications you can add depends on the watch face you’re using. Some support up to nine at the same. time, while other ones aren’t as generous. To choose yours, just click on an existent watch face you’re using in the Watch app on your iPhone. If you’re adding a new face, you can select the complications you want before clicking the Add button.
4. Change the app layout
Just like on iOS, you can change the app layout on watchOS through Jiggle Mode. Just click and hold on the apps screen, then select Edit Apps. You will then be able to drag them around to reorder them and even delete some of them. Alternatively, you can use the Watch app on your iPhone to take advantage of the bigger screen. Apple Watches support both Grid and List Views — the latter is strictly alphabetical, though.
5. Add your vaccination certificate to it
We’ve reached a point where plenty of entertainment venues and airports ask for COVID vaccination proof. Digging through your files or photos to find the QR code of the certificate can be an annoyance, especially when your hands are full. That’s why we’ve prepared a guide for you on how to manually add your vaccination certificate to your Apple Wallet. This allows you to easily access it with a double click on the side button of your watch.
6. Silence its audible alerts
Apple Watches have speakers, but plenty of us find that somewhat useless. The watch includes a Taptic Engine that provides a good level of haptic feedback when you receive a notification. So assuming you’re wearing it, you will most likely feel that. If you’re not wearing it, you can just unmute your iPhone to hear the notification alerts as they come in. The point is — the notification sounds on the Apple Watch are redundant to many of us. To silence audible alerts, just swipe up to open the Control Center and hit on the bell icon. You can also set a silent but vibrating alarm on your Apple Watch to avoid waking up startled.
7. Set your activity goals
Many of us buy this watch for its health and fitness tracking features. To set or change your activity goals, head to the Activity app on your watch, scroll to the bottom, and click Change Goals. This will allow you to change how much it takes to close the Move, Exercise, and Stand rings. As a piece of advice — set realistic goals that are achievable but also slightly push you to do more. This way you will likely remain motivated to close them. As a result, you will slowly advance as you set higher goals every few weeks or months.
8. Learn how to shower or swim with it
The Apple Watch is water-resistant. This means you get to shower or swim while wearing it. Before you hop into the shower, pool, or ocean, swipe up to reveal the Control Center, and click on the water drop button. This will kill the touch display so the watch doesn’t register the water drops as random clicks. This way you won’t end up accidentally iMessaging your live heartbeat to that ex you’ve forgotten to delete the number of.
Once you’re done with the shower or swim, rinse the watch with clean, non-salty water. Make sure the water enters its speaker and microphone holes. This will clear out any soap or salt stuck inside. After you’re done with rinsing it, rotate the Digital Crown until it starts beeping and ejecting the water through its speaker holes. This will unlock the touch controls again, and you will be able to use your watch normally afterward.
9. Add your friends to the Fitness app to compete
Competing with or comparing our progress to others can be very motivational. Apple allows its watch users to share their activities with their friends and family members. To do this, launch the Fitness app on your iPhone and head to the Sharing tab in the bottom right corner. Click on the icon in the top right corner and search for the contact you want to add. Click their name and send them an invitation.
Once they accept it, you will be able to view their three activity rings and the workouts they’ve done for the day. You can also challenge them by hitting the compete button inside their profiles. Competitions last for a week and are based on a points system. The person who earns more points will earn an award by the end of the 7 days.
10. Change the default band and protect it with a case
Sometimes default watch bands can get boring. Fortunately, Apple and third-parties sell alternative ones. You can change the bands by taking the watch off, and sliding the bands out as you click and hold on to the tiny buttons on the back that secure them in. Afterward, slide the new bands in and you’re good to go!
A case can make an Apple Watch look hefty, but it’s worth it if you tend to bump your wrist into hard objections. Cracking the screen will take away its premium look, and you wouldn’t wanna do that to your brand new watch. To spare you the endless dilemmas of having to choose the color, style, and material, we have compiled for you a list that narrows you down to the best watch bands and cases available out there.
The Apple Watch is a feature-rich device that will slowly turn into a companion you can’t leave behind. It provides accurate health and fitness-related measurements and pushes you to do more. Not only that, but it also tightly integrates into Apple’s ecosystem, allowing you to do things like unlocking your Face ID iPhone when masked and your Mac. It truly is a small but handy bundle of might.
What is your favorite Apple Watch feature? Let us know in the comments section below.
Among all the fantastic features and changes that Android 12 brings along, it also introduces some rather controversial changes. We have already talked about how Android 12’s new background app limitations can run havoc on apps like Termux. Another annoying change in Android 12 is the way it handles external links. If you’ve recently upgraded to Android 12, you probably would have noticed that when opening links, you no longer get that familiar “Open with” dialogue. Links will either automatically open in their corresponding apps or take you straight to Google Chrome or your default browser. If you’re not a fan of this change and want to restore the way things were in older Android versions, read on.
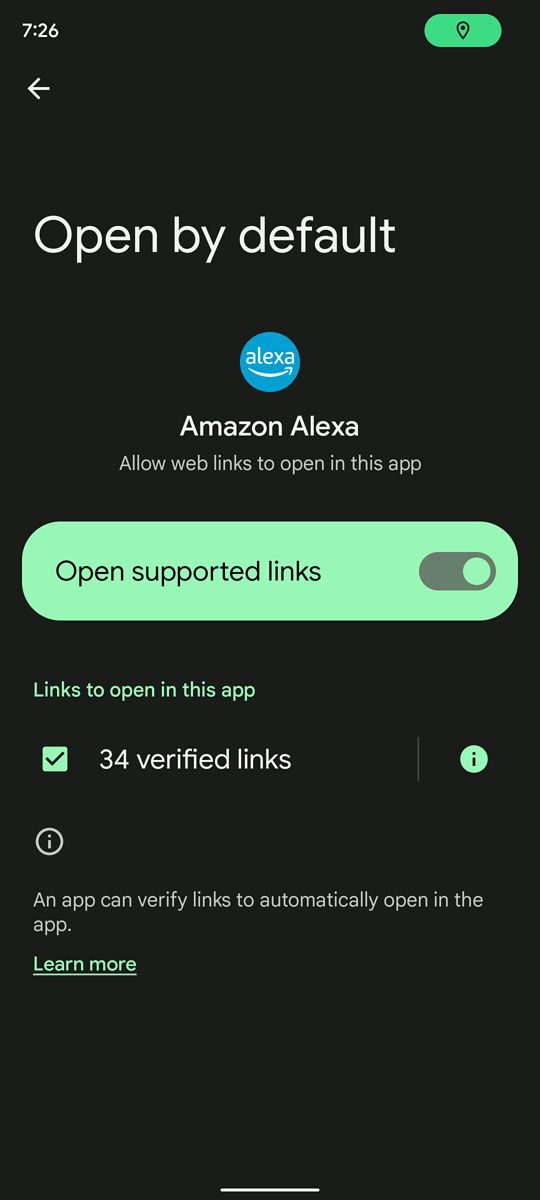
Starting with Android 12, Google now only allows “verified links” to be opened in external apps. Verified links allow app developers to ensure that only their app can handle links from their domain. If a link is non-verified, Android 12 will open it in the default browser, instead of showing you the app selection dialogue. But thankfully there’s an app called Better Open With that lets you get around Android 12’s new link handling behavior.
How to fix the handling of links on Android 12 with “Better Open With”
Download the “Beter Open With” app from the Play Store.
Now on your Android 12 phone navigate to Settings > Default apps > Browser app.
Set Better Open With as your default browser.
Now go to Settings > Default apps > Opening links and turn off the “Open supported link” toggle for every app that supports verified links.
That’s it. Now whenever you open a link, you’ll see the familiar Complete Action With dialogue listing out all the apps that can handle that link — just like in previous Android versions.
Even if you’re not running Android 12, “Better Open With” is still a great replacement for the system app chooser as it gives you more customizations and control.
The Dell Inspiron 14 2-in-1 is mostly just a mainstream convertible, but for some reason, I just fell in love with it. There’s something about the design that feels natural, and the keyboard is comfortable. All in all, the laptop is a delight in an almost indescribable way.
So read on, while I go ahead and try to describe it.
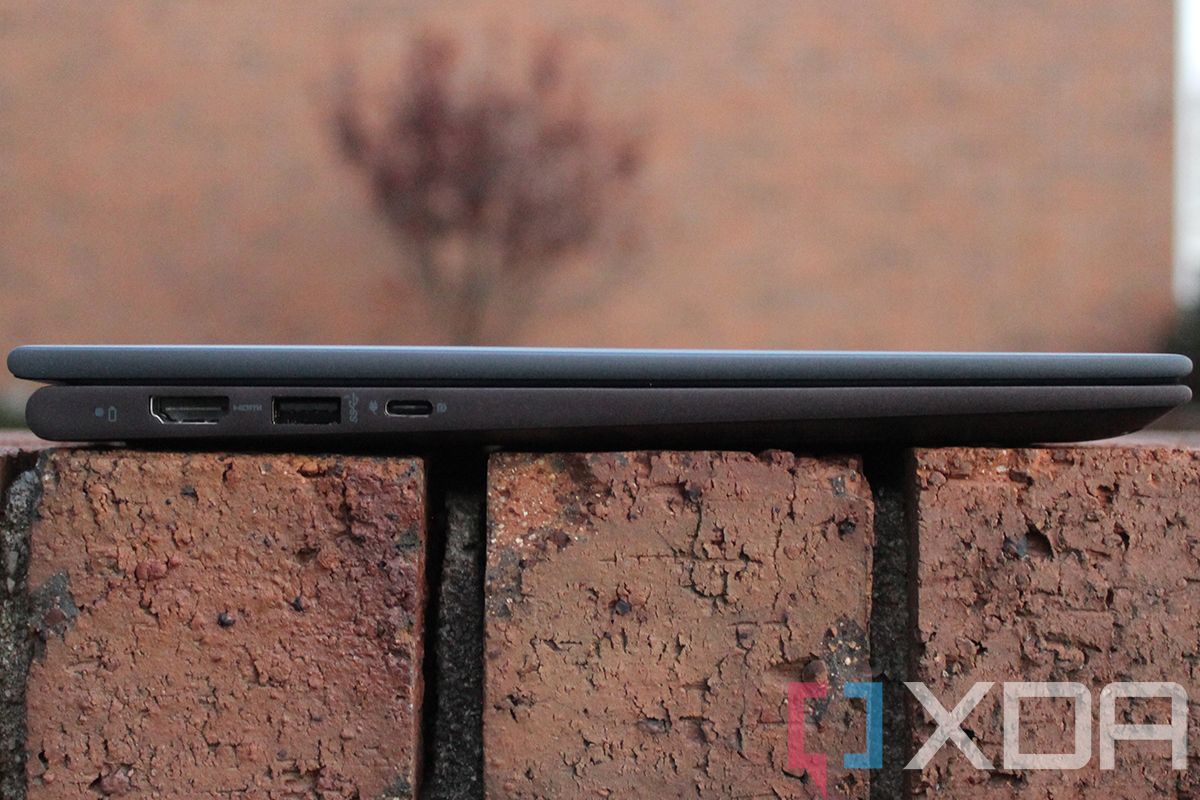
1 HDMI out 1.4b
2 USB 3.2 Gen 1 Type-A
1 USB 3.2 Gen 1 Type-C with PowerDelivery and Video
1 3.5mm Headphone/Microphone combination jack
microSD Card Reader
Keyboard
Spill resistant, backlit
Camera
HD (720p) Camera with Camera Shelter
Audio
Stereo Speakers with Waves MaxxAudio Pro tuning
Integrated Dual Array Microphones
3.5mm Headphone/Microphone combination jack
Connectivity
Intel Wi-Fi 6 2×2 (Gig+) and Bluetooth 5.0
Battery
4-Cell Battery, 54 Whr (Integrated)
Material
Aluminum and Plastic
Color
Mist Blue
OS
Windows 10 Home
Price
$1,049
This product starts at $849, packing a Ryzen 5, 8GB RAM, and 256GB of storage. There’s also a Pebble Green color listed in the guide, but not on Dell’s product listing.
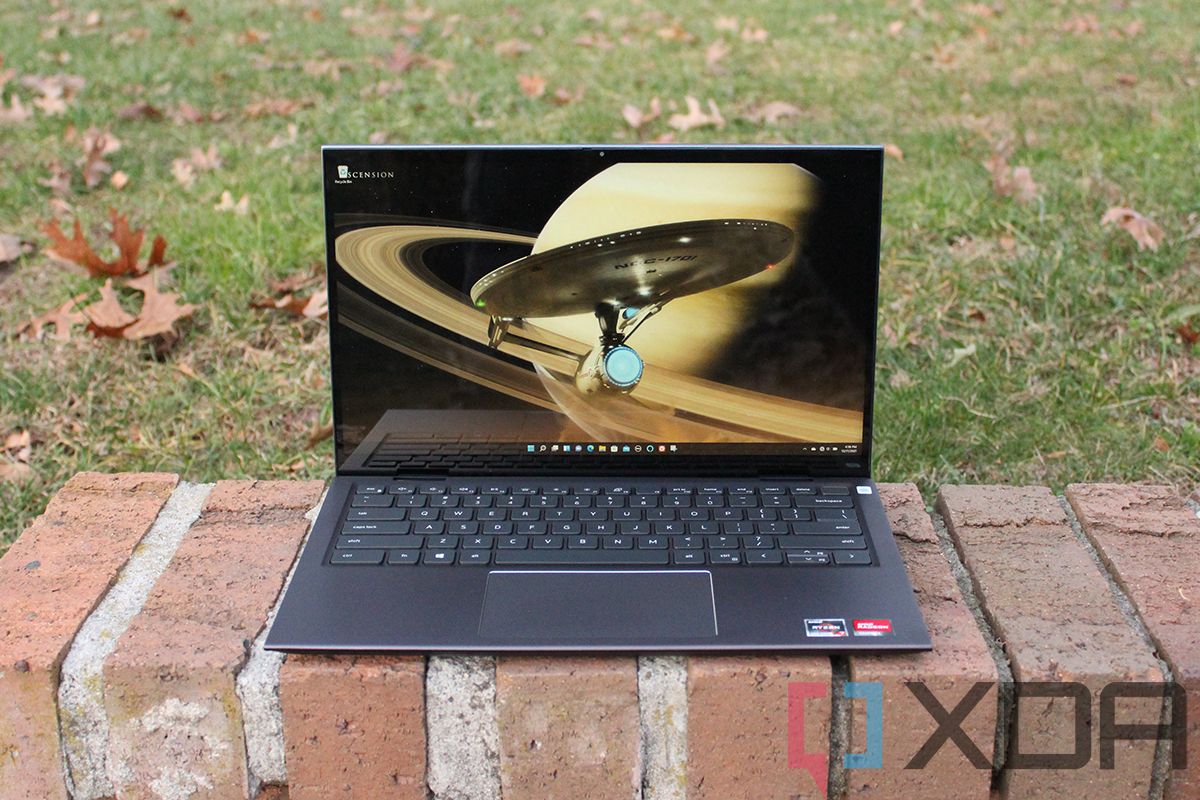
Design: The Dell Inspiron 14 2-in-1 comes in a Mist Blue color with a unique design
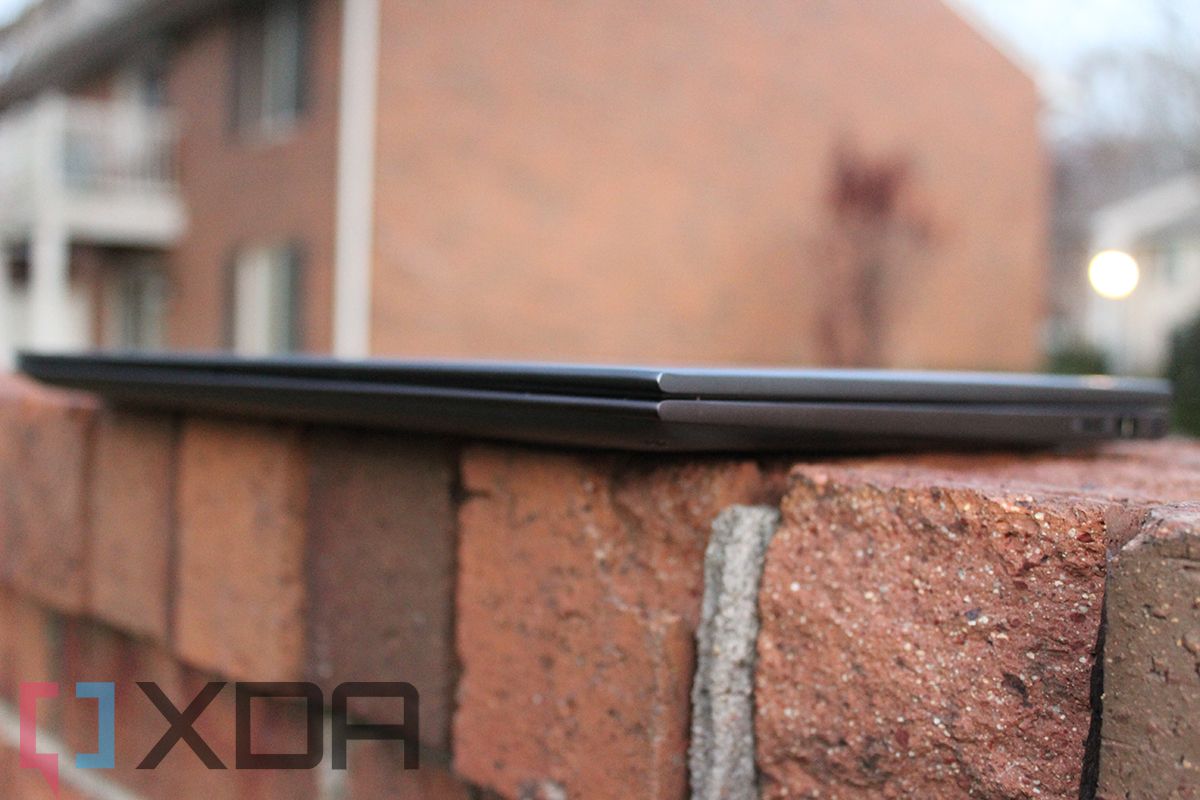
The design of the Dell Inspiron 14 2-in-1 is somewhat unique, and that’s one of the key reasons that this feels so nice to use. It comes in a color called Mist Blue, and with the aluminum and plastic chassis, it feels premium. The soft blue color was something that I liked right away, as I always like colors on laptops as opposed to a generic silver or gray.
But what I really like about the design is the rounded edges on the front and rear; the sides are still flat. It makes it easy to lift the lid, and again, it’s something that’s just a bit different from the rest of the market. In a world of MacBooks and MacBook clones, it really does help to have something that just feels different.
Upon opening the lid, you’ll find that the lid actually moves back a bit so that it props up the laptop. This creates a gap between the surface and the bottom of the Dell Inspiron 14 2-in-1, providing better airflow. As you probably know, the more you can keep the inside cool, the better and more sustained performance will be.
The subtle design of the Dell Inspiron 14 2-in-1 is similar, yet unique.
All of the ports are kind of last-gen, sadly. On the left side, there’s an HDMI 1.4b port, a USB 3.2 Gen 1 Type-A port, and a USB 3.2 Gen 1 Type-C port. All of the USB ports support 5Gbps speeds, rather than newer standards that support 10Gbps (USB 3.2 Gen 2), 20Gbps (USB 3.2 Gen 2×2), or 40Gbps (USB 4). Being that this is an AMD machine, there’s no Thunderbolt. That part is no surprise. It’s just strange to have HDMI 1.4b instead of HDMI 2.0 (or even 2.1), and to have older USB ports.
On the right side, there’s another USB 3.2 Gen 1 Type-A port, a 3.5mm audio jack, and a microSD card slot. It seems more common for high-end consumer laptops to have two USB Type-C ports and one Type-A port, rather than the other way around. Still, that’s fine. The USB Type-C port does support video out and charging, so you might be able to make use of the dual USB Type-A ports for other things, perhaps for a mouse and external storage, for example.
I really love the design of the Dell Inspiron 14 2-in-1. I love the feel of the rounded front and back, the color, and more. It really feels good to use.
Display: A 14-inch FHD 16:9 touchscreen
The Dell Inspiron 14 2-in-1 has a 14-inch, 1,920×1,080, 16:9 touchscreen. That’s pretty much the story, because there’s not much else that’s special about it.
From my testing, it supports 67% sRGB, 48% NTSC, 50% Adobe RGB, and 50% P3, which really isn’t great. I actually ran this test a bunch of times in different ways, and then I tested my MacBook Pro just to see if there was something wrong with the sensor. Frankly, I didn’t expect the results to be this low, and had a hard time believing it.
Brightness maxes out at 278.3 nits, which means that it’s not going to do great in bright sunlight, and contrast ratio maxes out at 1,120:1.
The viewing angle on the screen seems to be a full 178 degrees. In fact, if I was going by my naked eye, I’d say that the display is much better than the test results. But still, there you have it. It’s something to be aware of if color accuracy is critical to your work flow.
Right above the screen is a webcam with a physical privacy guard, which is always nice. Unfortunately, the webcam is still 720p, a shame when the webcam has become such a critical component.
Dell did send me its UltraSharp 4K Webcam, which is phenomenal. Indeed, if you want to look good on calls, this is the webcam to get. It supports AI zoom, meaning that if you move around, it will automatically zoom in on you. It also supports HDR and more.
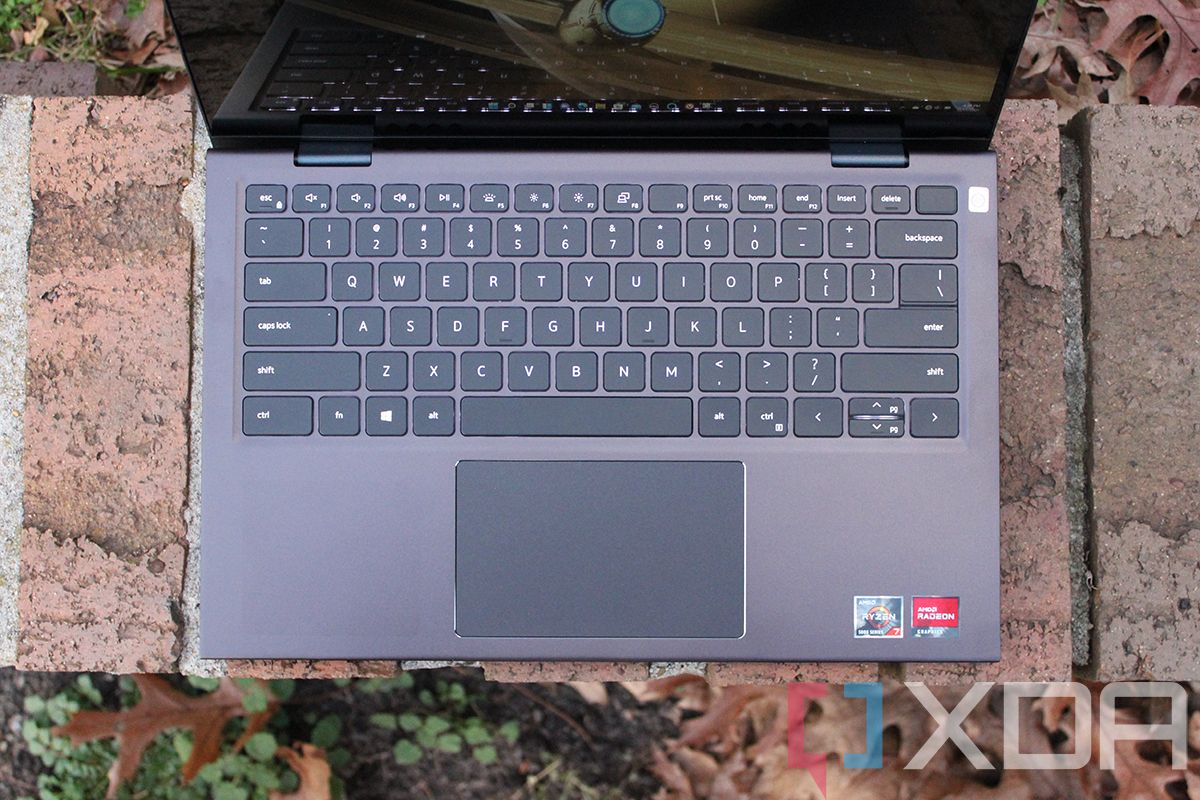
Keyboard: The Dell Inspiron 14 2-in-1 has bigger keys, and they feel great
I really like the keyboard on the Dell Inspiron 14 2-in-1. Dell says that it made the keys 9% bigger, and I can feel the difference. I never thought ‘spacious’ was a word I’d use to describe a laptop keyboard, but here we are.
I never thought I'd use the word 'spacious' to describe a keyboard, but here we are.
The keyboard is comfortable to type on, but it almost takes a little bit of getting used to. The keys aren’t wobbly or anything, something that would ruin the experience of the larger keys. It just kind of feels different in a good way. Again, I like it a lot.
The Microsoft Precision touchpad is fine. Dell says that it’s glass-like, meaning that it’s not glass, but that’s fine. It gets the job done.
At the top-right of the keyboard is a power button that doubles as a fingerprint sensor. Once again, Dell doesn’t scan your fingerprint when you press the button to power on the machine. You still have to touch it again after it boots up, and this is contradictory to the behavior of any PC with a fingerprint in the power button that’s built by a different OEM.
Dell thinks it’s a security risk to automatically log you in by scanning your fingerprint when you first press the button. Personally, I think users know how their own laptops work, and if they know their computer is going to automatically log them in, they won’t walk away from it in a public place in that five to 10 seconds or so.
Dell Mobile Connect is a reason to buy a Dell
Honestly, Dell Mobile Connect deserves more shout-outs than it gets, because if you’re an iPhone user, you really should be using a Dell laptop. The app lets you send and receive texts from your laptop, and it also lets you send and receive files, mirror your screen, and more. It works with both Android and iOS.
If you've got an iPhone, Dell Mobile Connect is the reason you should be using a Dell PC.
The big difference is that there are a ton of services that do this with Android. With iOS, that’s not the case. Even Microsoft’s own Your Phone app has put zero effort into getting it to work with an iPhone. Other solutions, like HP’s, lets you send files that are smaller than 50MB, but that’s about it.
With Dell Mobile Connect, sharing a file is like using AirDrop, but with a Windows PC instead of a Mac. It’s that fast, and if you’ve not experienced the pain point of transferring a 4K 60fps video you just took from an iPhone to a Windows PC, then you know that this is an amazing feature to have.
Performance and battery life: It has AMD Ryzen 5000 processors
The Inspiron 14 2-in-1 that Dell sent me comes with an AMD Ryzen 7 5700U, 16GB RAM, and a 512GB SSD, which is pretty solid for a fairly low price tag. There’s another model with a Ryzen 5 5500U, 8GB RAM, and a 256GB SSD, but I wouldn’t consider that one. It really doesn’t cost much more for the higher end model.
There’s good news and bad news here. The Ryzen 7 5700U is essentially AMD’s answer to Intel’s Core i7-1165G7. These companies are kind enough to give their comparable products the same numbers. AMD Ryzen 5000 is really good too. Assuming you buy this for normal ultrabook purposes, you’re in great shape.
Battery life is pretty good, averaging around six hours, but the problem is really performance while on battery life. Running PCMark 10, it scored 5,320 when connected to power. While not plugged in, it scored a disappointing 4,046. Both tests were performed with Windows set to best performance. That’s almost a 24% drop in performance just from disconnecting a power cable, and sadly, this is typical for AMD Ryzen laptops.
I don’t want to say that performance is actually bad when it’s not connected to power. You can still use your laptop as you normally would. There’s just a dip in performance that’s significant enough to get a mention.
For benchmarks, I used PCMark 10, 3DMark, Geekbench, and Cinebench. All of these were with the unit plugged into power and set to best performance settings.
Note that if we compare the score when the machine is disconnected to power, it compares more to Intel eighth-generation machines.
But when it’s plugged in, you can see that overall, it compares to pretty beefy laptops like the Surface Laptop Studio and last year’s Dell XPS 17. They compete in different ways though. As you can see from Time Spy, the other two laptops do much better because they have dedicated graphics. The Dell Inspiron 14 2-in-1, on the other hand, has eight cores, so it does better in multi-core tests than the Surface Laptop Studio does.
Conclusion: Should you buy the Dell Inspiron 14 2-in-1?
The short answer is yes, the Dell Inspiron 14 2-in-1 is an easy laptop to recommend. Despite a few shortcomings, it still punches well above its weight.
As mentioned, there are a few shortcomings. The screen falls short in the color gamut department, and performance takes a big hit when the laptop isn’t connected to power. And of course, the webcam is still 720p.
With all of that considered, I still fell in love with this machine. It’s just a delight, from the keyboard with its larger keys to the familiar yet unique design that has rounded edges and a subtle blue color. Performance in general is pretty good too, as tends to be the case with AMD Ryzen processors.
And let’s not forget that all specced out, it still only costs $1,049. If that’s the price target that you’re trying to hit, then I’m not sure what else you could want from a laptop.
Apple products are known for their durability, and they tend to be supported for years to come. The company has been manufacturing several models of its iPhone and iPad lineups to match almost all budgets and needs. If you don’t want to spend a fortune on an iDevice, you’re no longer limited to older, outdated models. Assuming you’ve recently bought or received one, you might be wondering what to do with it. Here are the first 10 things to do with a new iPhone or iPad.
iPhones are known for their full backups and seamless data transfer process. When you back up an iPhone to iCloud or through a computer, it preserves all of the data. So restoring these backups on a wiped or new device will return everything to its previous state. What not all people know, though, is that you can restore an iPad backup on iPhone and vice versa. So if you already own an iPhone and have an iCloud backup of it, you can restore this backup on your new iPad. iPadOS will restore the common settings and data shared with iOS. And if you don’t have an iCloud backup, you can put your iDevices side by side to transfer the data.
2. Secure it with a password
Setting a password ensures your data is safe(r) if the iDevices end up in the wrong hands. It’s one of the first things you should do after getting a new iPhone or iPad. iOS and iPadOS prompt you to optionally choose one when you’re setting up a device. However, if you’ve already skipped this step, you can manually add one in the Settings app on your iDevice. Newer iPhone and iPad models support Face ID or Touch ID. This allows you to unlock your device and authenticate purchases without needing to enter your password every time.
3. Personalize your Home Screen to make it homelier
iOS 14 introduced Home Screen widgets on the iPhone. The feature didn’t make it to the iPad at the time — for some reason — and plenty of users were furious. Apple redeemed itself with the release of iPadOS 15 and ported this feature to the bigger screen. One thing you should do when you first get an iDevice is customize the Home Screen. This isn’t limited to changing the wallpaper only. Organize apps in a way that makes sense to you and take advantage of the numerous widgets to view information at a glance.
Both stock and third-party apps support the new widgets — if the developer has implemented them. The best part? They’re compatible with both portrait and landscape orientations on iPadOS. So when you rotate your iPad, your setup won’t get messed up. There’s more that Apple could do to make Home Screens better. But until then, go ahead and customize your new virtual home!
4. Customize your Control Center
The Control Center on iOS and iPadOS has plenty of toggles that not all of us might find useful. Fortunately, Apple allows users to add, remove, and reorder these toggles. So you’re not stuck with the layout that is presented by default. One of the first things you should do when setting up a new iDevice is heading to the Settings app and changing them in the Control Center section. This enables you to choose between over one dozen options.
5. Set up FaceTime and iMessage
FaceTime and iMessage access is one of the many reasons some users choose to buy Apple products. These privacy-focused communication tools will allow you to effortlessly reach your fellow iDevice-using friends and family members. Launch the Settings app, and scroll to the FaceTime and iMessage sections. There you will be able to choose your ID (what people see when you interact with them), such as your phone number or Apple ID email address. You can even set an iMessage profile photo and name.
6. Enable Find My
Find My allows you to locate, erase, or control your iDevice remotely. With recent updates, this feature can work offline under certain conditions. So your device doesn’t need to be connected to WiFi or mobile data for it to work. And some newer iPhones support this feature even when they’re completely turned off! Enabling Find My is one of the first things you should do when getting a new iDevice. This ensures that you can still to some extent control it if it’s lost or stolen. Head to the Settings app > [Your Name] > Find My > Find My iPhone/iPad > and toggle all three settings on if they’re off.
7. Disable WiFi Assist
Plenty of us still subscribe to limited data plans and find our precious megabytes magically disappearing. iDevices have an option called WiFi Assist, and it’s enabled by default. What does this option do? It leaches on your mobile data when your WiFi connection is unstable or too slow. This is one of the first options I disable when I’m setting up an iDevice because it works stealthily.
Plenty of users aren’t aware of it, and I believe it should be off by default. At least it should notify users the first time it’s working for them to learn about its existence. Head to Cellular preferences in the Settings app and scroll towards the bottom, then disable this lil thief. Similarly, if you don’t want iCloud Drive to sync over mobile data, disable the option right below WiFi Assist.
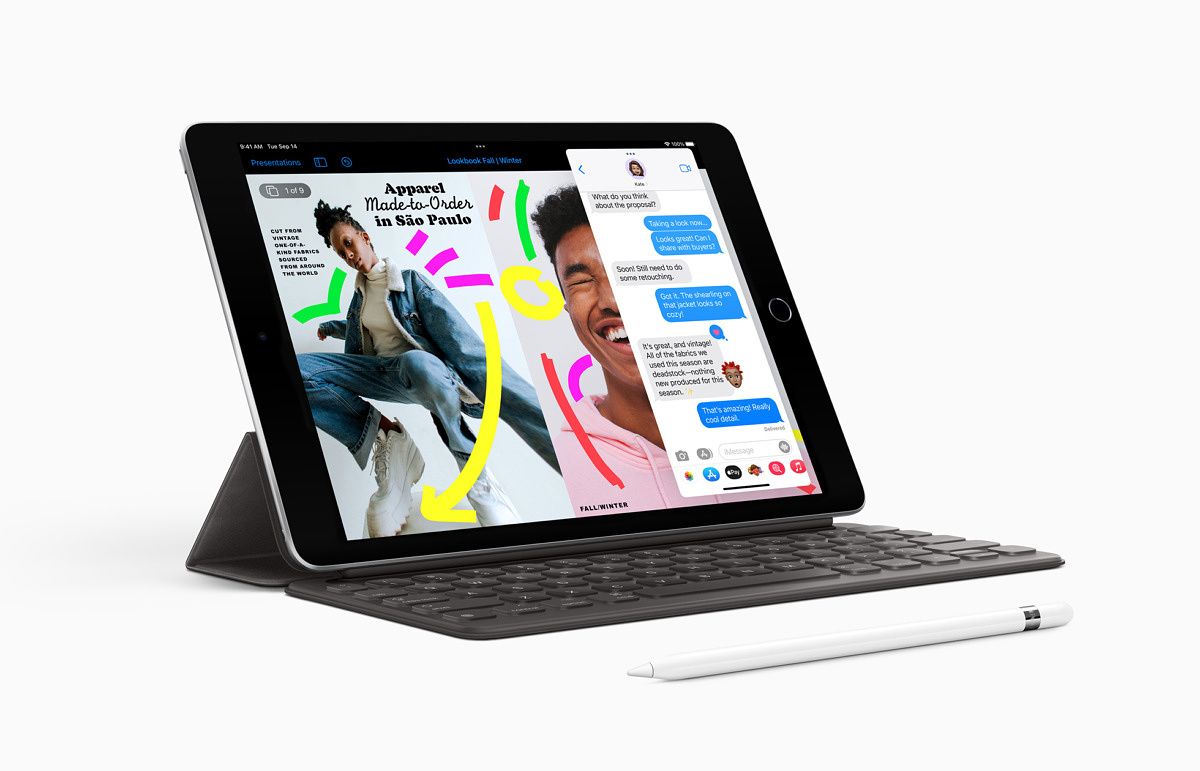
8. Draw a smile on your iPad’s face
iPadOS 15 homescreen with widgets being allowed anywhere.
An iPad can get lonely at times, and there’s no better way to make it happier than bringing it closer to its best friend. Whether you’re using a high-end iPad or an affordable one, there’s a pencil for it. The Cupertino giant currently sells two Apple Pencil models. Depending on your iPad’s Pencil compatibility, you can buy one to take advantage of even more features.
You can use this advanced stylus to turn your handwriting into typed text. Additionally — if you’re an illustrator — you can use it to precisely doodle your next masterpiece. The iPad display can detect pressure and change the stroke’s size depending on how hard you push. It’s the perfect companion for your new glass slab. You can buy both the 1st Gen and 2nd Gen models from Amazon. iPhones still don’t support Apple Pencils for the time being, so don’t buy one if you don’t own a compatible iPad.
9. Make your iPad grow a limb or two
It’s a shame that most of the newer iPads only have a port or two, especially since iPadOS supports external storages. The good news is that you can buy dongles and accessories to make your Apple tablet more adaptable and versatile. The not-very-good news is that you have to buy them separately. This page lists the official additions you can get for your iPad to make it even more capable.
10. Get a case — just in case
iDevices are delicate — accidentally drop them (heaven forbid) and they’re shattered to a million pieces. Buying your shiny glass slab a case would be a very wise decision. Scratches and cracks will only make it look worn out and not as premium. You don’t have to limit to yourself to regular cases if you have an iPad, for some of them come with keyboards if those better match your needs. To make the selection process easier, we have compiled for you several lists with various iPhone and iPad models and case types to choose from.
iPhones and iPads are great devices for everyday needs. Whether you’re looking for entertainment, productivity, online socializing, or a mix of everything — an iDevice will provide you with a solid experience that you won’t regret. Once you’ve set up your device, explore its capabilities and additional features. And don’t forget to install your favorite apps!
Which iDevice model do you own? Let us know in the comments section below.